Git Flow with Xcode Cloud
08 JUL 2024
Introduction
I've recently been exploring Xcode Cloud and want to share my experience setting it up for a Git Flow workflow. If you're an iOS or macOS developer who hasn't tried it yet, Xcode Cloud might be worth your time. It integrates directly with Xcode and works with popular version control platforms like GitHub, Bitbucket, and GitLab. The main advantages are its simplification of code signing, TestFlight uploads, and overall ease of setup compared to traditional CI/CD pipelines.
Introduced during WWDC21, Xcode Cloud is designed to replace Xcode Server and simplify the application development and publication process. In 2022, Xcode Cloud became available to all developers; in 2023, Xcode received a couple of important features like a dedicated "Integrate" menu for source control and cloud workflows, and the ability to add localized test notes to the project itself — and you may find it mature and robust enough now to replace custom-built CI/CD scenarios on platforms of your choice.
For those who use Git Flow or similar branching strategies, Xcode Cloud can be configured to complement this workflow effectively. The use of Xcode Cloud can replace workflows and simplify project codebase. Xcode Cloud works with private and public repositories on Github, Bitbucket, and GitLab, and it is easy to connect to an existing project. It is an excellent choice for small projects that otherwise could rely on manual build and test processes. Here’s how I set it up.
Git Flow Workflow
The workflow described below loosely follows the Git Flow workflow to simplify collaboration and minimize the effort to undo mistakes — all of that without any unnecessary cognitive overhead to the team.
The main idea behind this workflow is to keep the production code in the main branch stable and clean — the code in this branch always matches the code of the latest App Store release. Developers work in isolated branches, so their changes don't immediately affect the main codebase. When a fix or a feature is ready, the corresponding branch is merged into the develop branch, and a new build appears in Test Flight for testing. Once a set of features is ready, it is tested in a controlled environment (release/ branches) before being deployed to production. This distinction between branches and roles ensures an efficient software development, testing, and release process.
Following this workflow, we are going to set up Xcode Cloud workflows for branches:
- the
mainbranch contains only production-ready code — specifically, the code published to the App Store. We are not setting up any specific workflow for this branch in the example below. - the
developbranch is the main development branch; every feature branch diverges from thedevelopbranch and, once complete, gets merged back into the develop branch.- When a developer creates or changes a pull request to this branch, Xcode Cloud runs unit tests to ensure the code doesn't break the existing functionality.
- When the
developbranch changes (e.g., when a pull request gets merged), Xcode Cloud prepares a build signed with a development certificate and notifies internal testers.
feature/andfix/branches for new features and fixes, respectively. When the code in these branches changes, we will run unit tests to ensure the new code doesn't break the project functionality.- the workflow for
release/branches is similar to the one for thedevelopbranch, with one exception: when arelease/branch changes, Xcode Cloud should prepare a build signed for distribution rather than development and notify external testers.
Signing builds in the develop branch with a development certificate and builds in release/ branches with a distribution certificate adds an extra layer of protection to the publishing process: it is easy to mistake a development build for one prepared for publishing in the long list of builds in the App Store interface, but only builds signed for distribution can be selected and published.
Connecting Project Repository with Xcode Cloud
The best demonstration of how Xcode Cloud works would be a simple application published on a git platform of your choice (for example, this demo application is available on Github) and connected to Xcode Cloud. Please note that because the app appears on your App Store account, even if not published, you need to create a unique name for your application, or you'll get an error during the Xcode Cloud connection process.
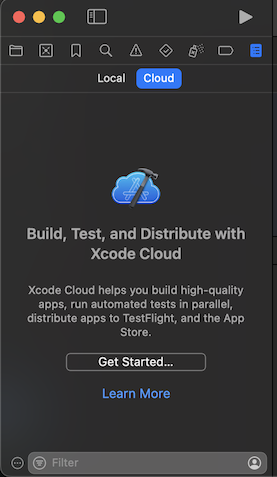
To connect a project with Xcode Cloud, select "Integrate" -> "Create Workflow..." in the Xcode menu. Alternatively, you can click the last button on the top of the Navigator panel, "Show the Report navigator," select "Cloud," and then click "Get Started" below:
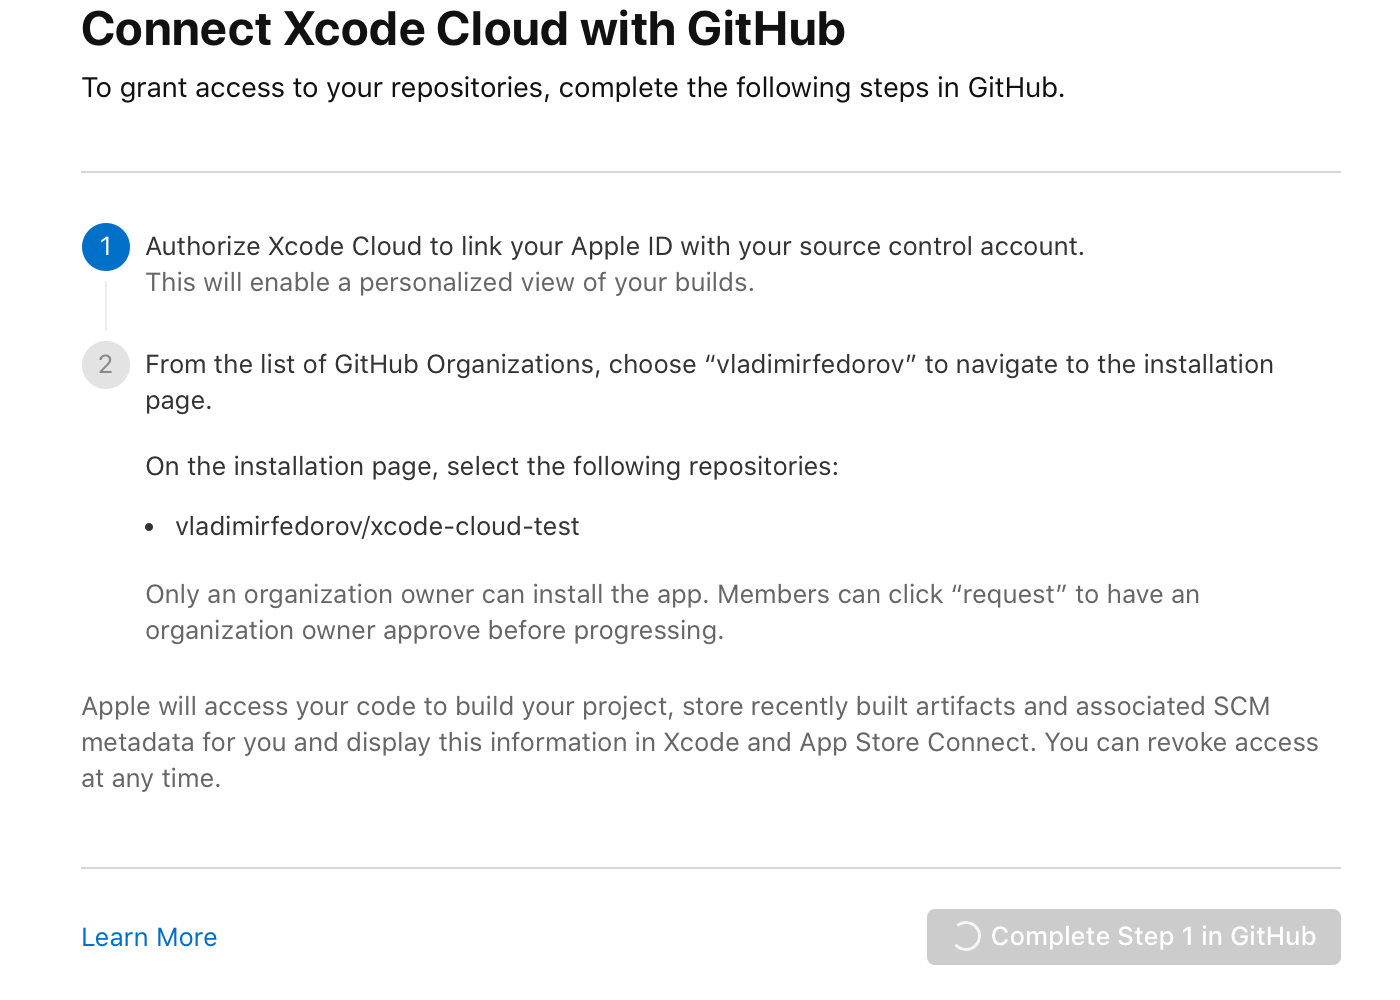
Xcode provides a step-by-step guide to this process. First, you need to associate your Apple ID and your source control account:
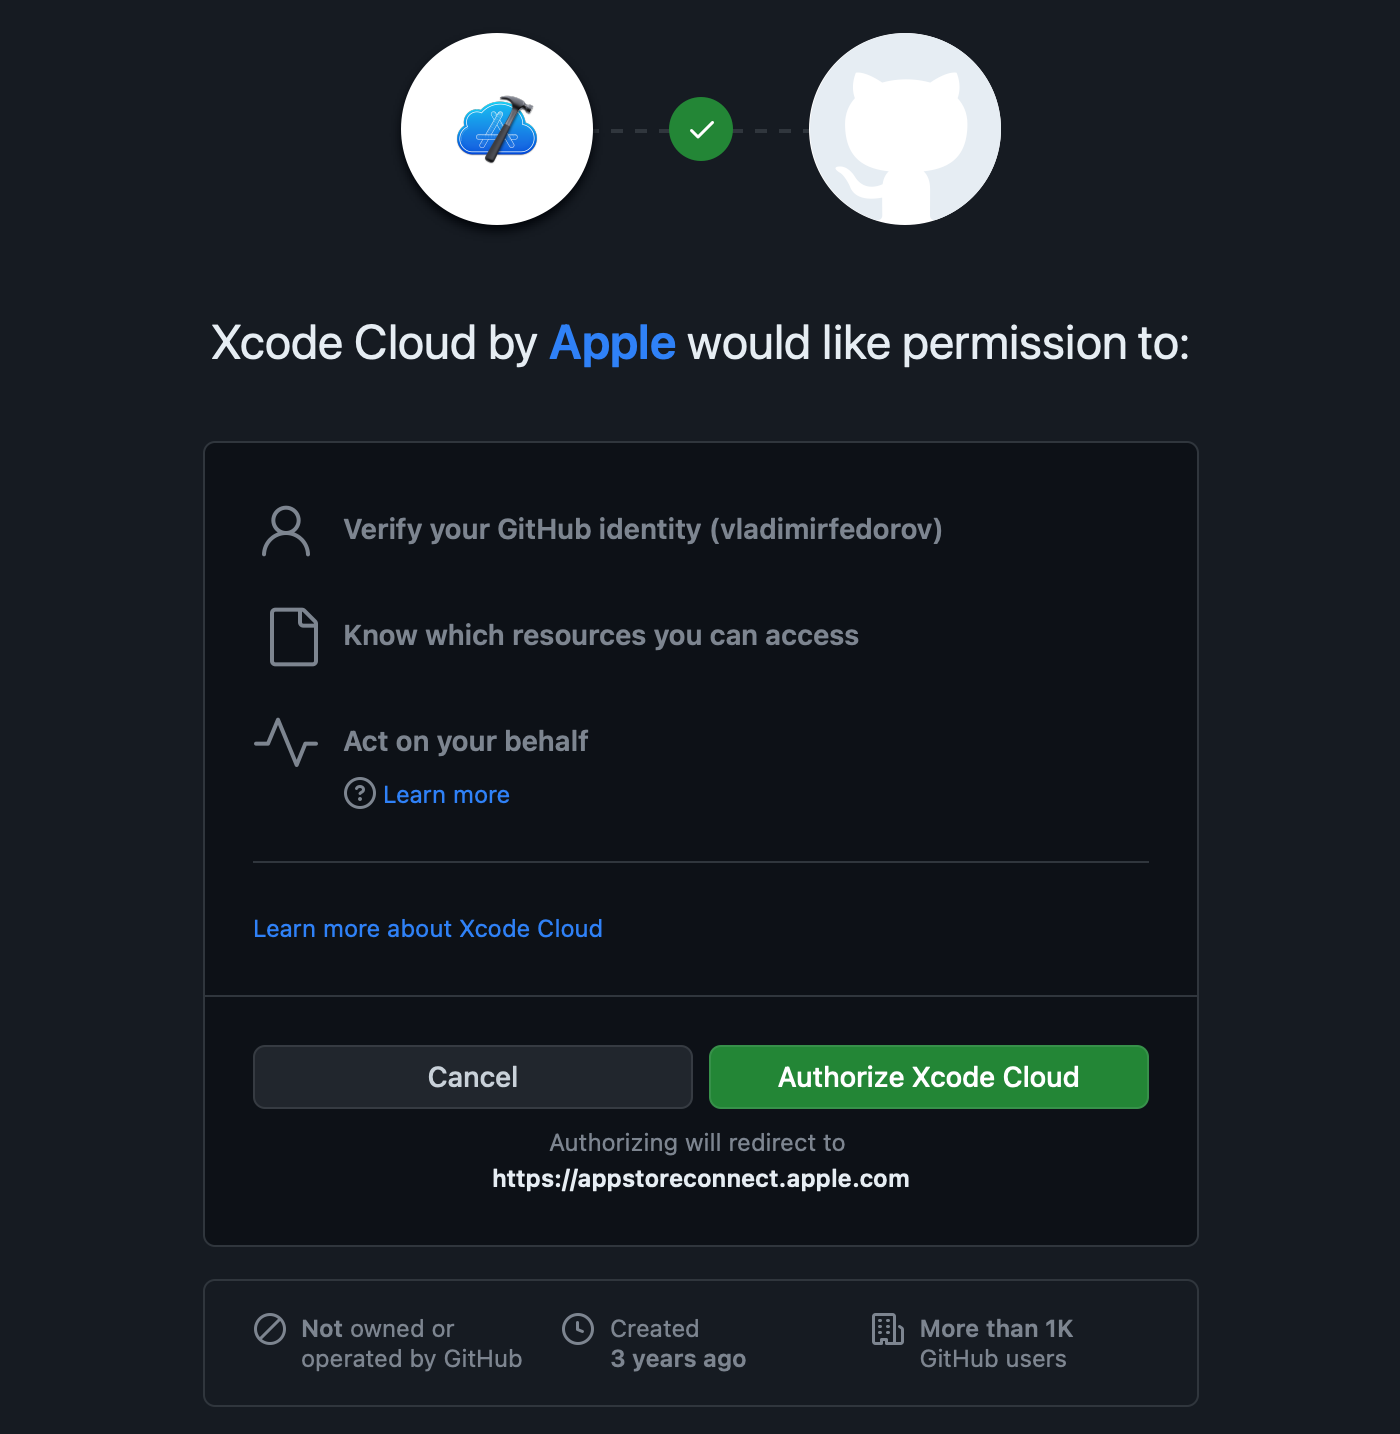
GitHub will ask your permission to add the "Xcode Cloud" application to your account:
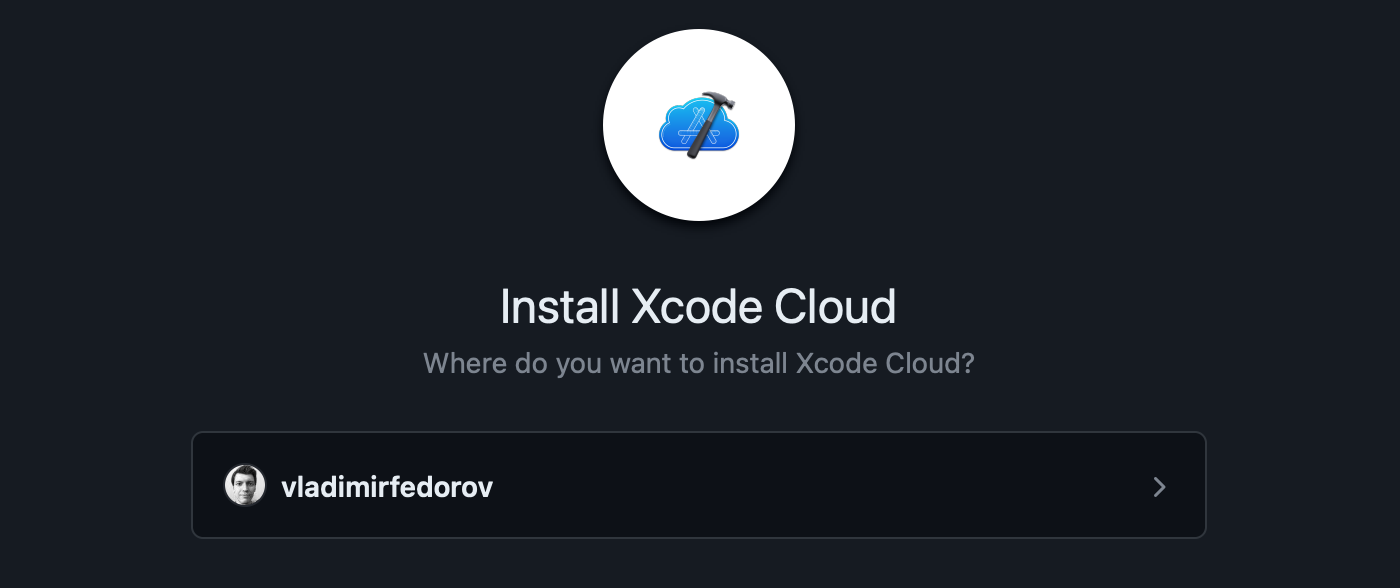
Next, you will be prompted to select the GitHub account for the application:

GitHub will show your account and a list of organizations you are in:
Finally, you'll need to grant access to the project's repository:
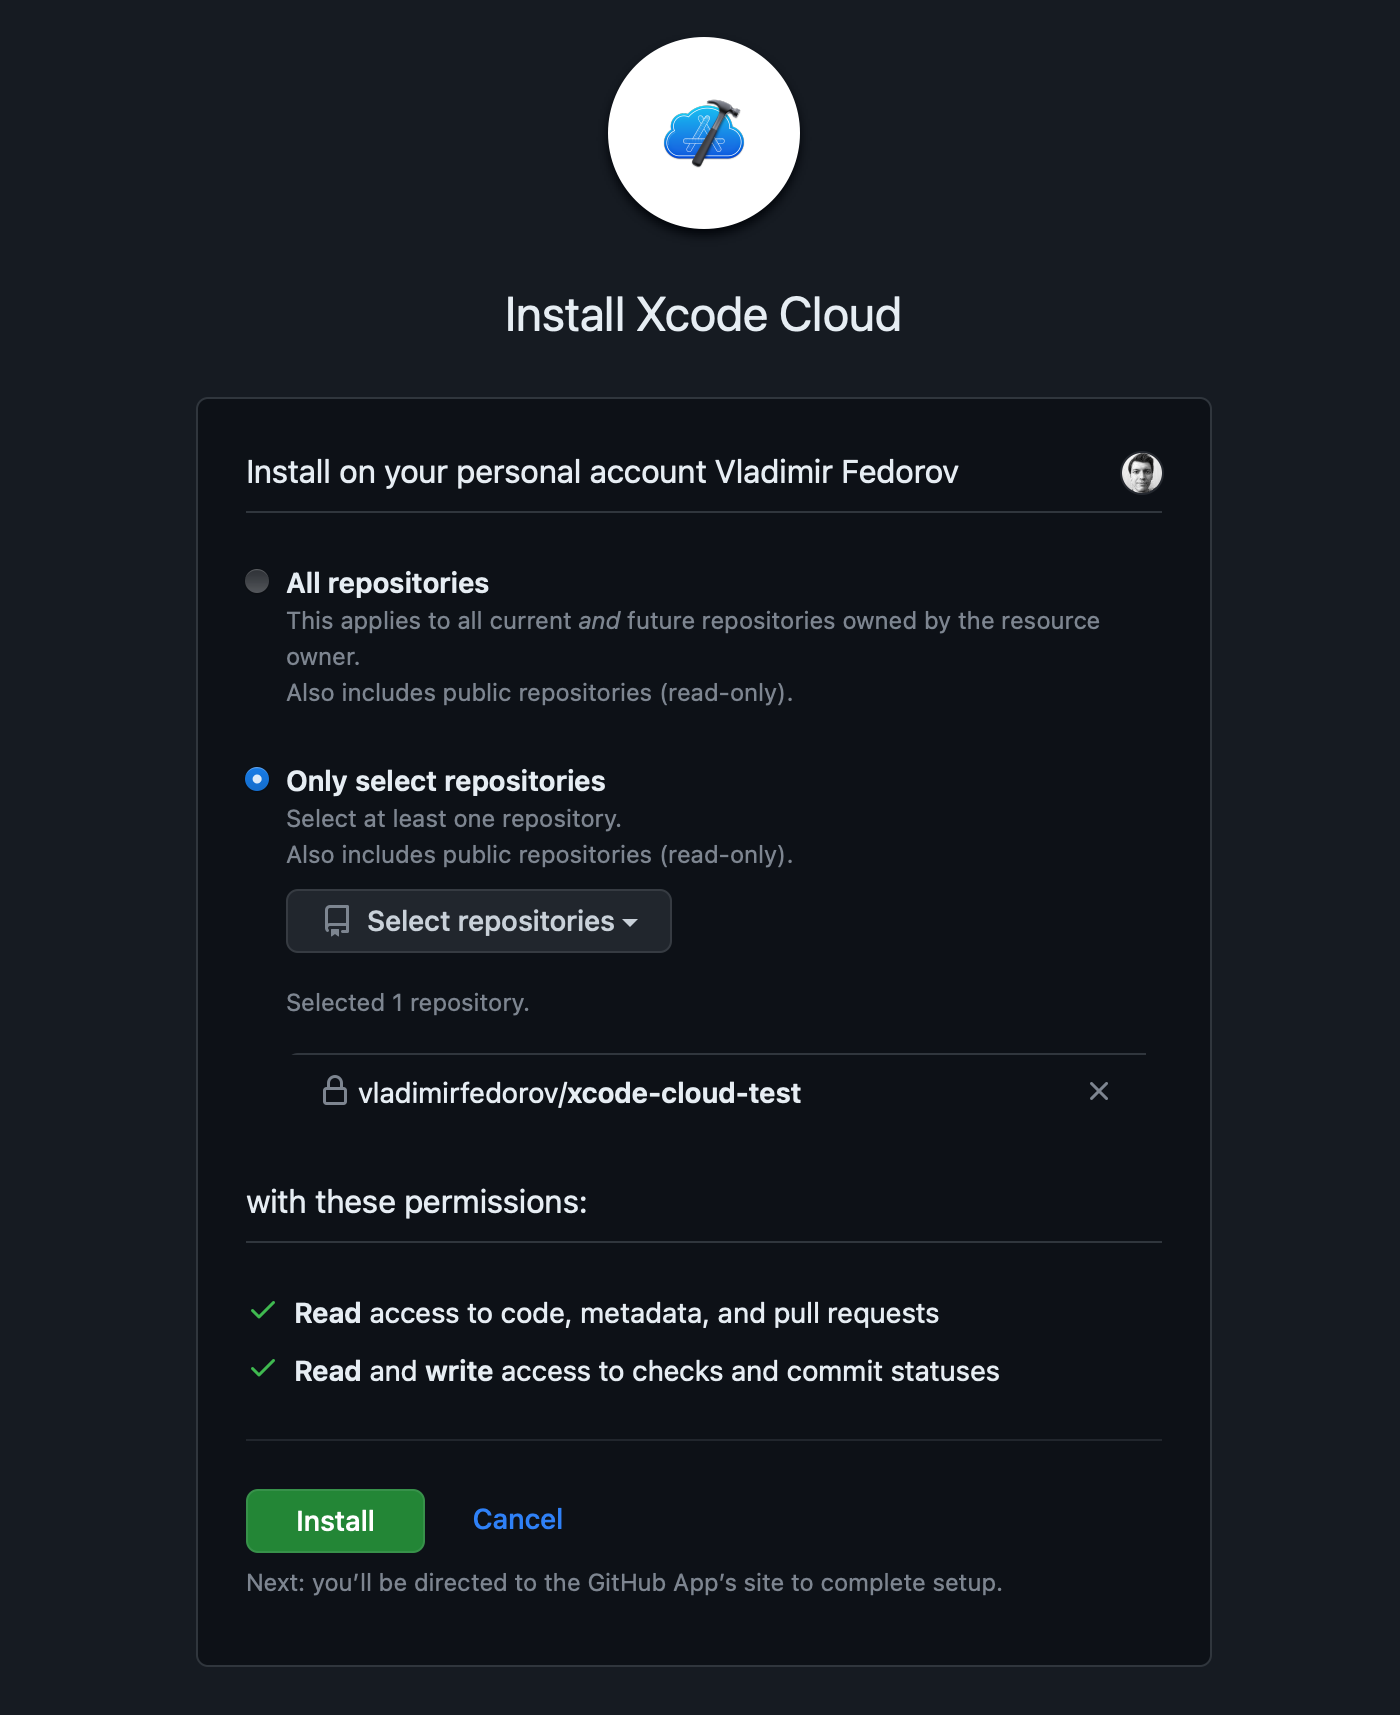
Xcode Cloud is a GitHub app; you will find it later under your repository's "Settings" tab. There, you can change repository access, suspend Xcode Cloud's access to the repository, or uninstall it, revoking access to all resources.
Once the Xcode Cloud is connected to the repository, the "Manage Workflows..." in the Xcode "Integrate" menu becomes active. You will also see created workflows under the last button on the top of the Navigator panel, "Show the Report navigator" in the "Cloud" section. You can configure a workflow by clicking "Edit Workflow..." in the workflow menu.
Workflow Configuration
The workflow configuration window is designed to configure and manage automated workflows for the project directly from Xcode. It replaces YAML scripts in popular CI/CD solutions, providing a more intuitive way to set up trigger events, store secure variables, or send notifications after the workflow completes its actions. You can temporarily turn each workflow on and off by clicking the switch next to the workflow name.
General
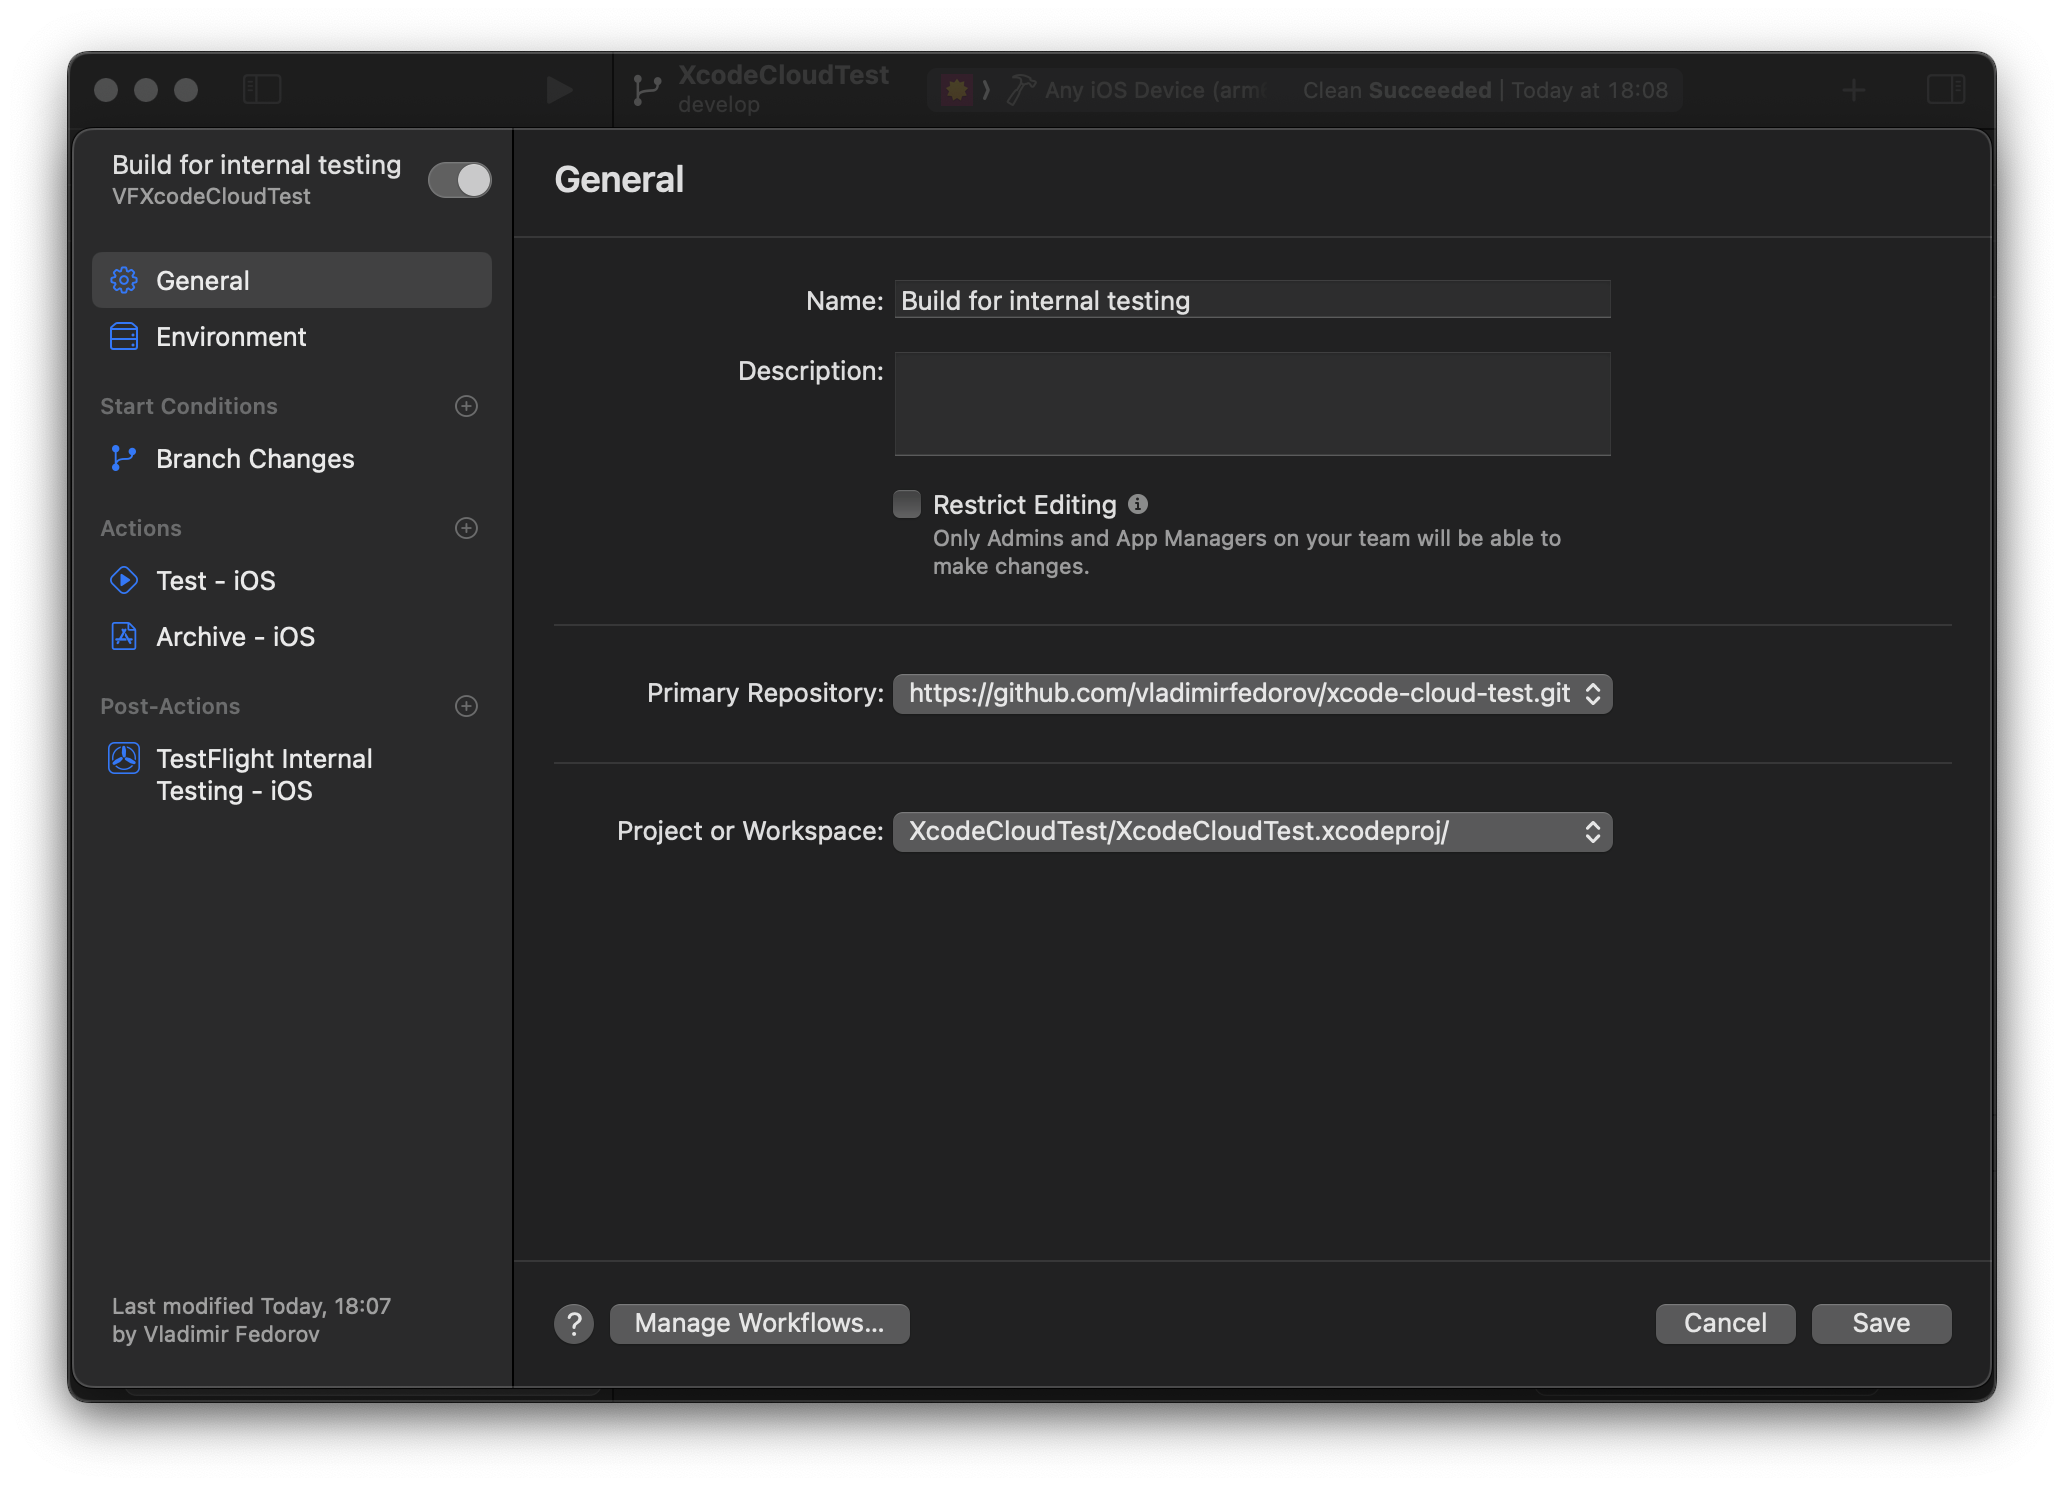
This section describes the workflow name, description, connected repository, and project or workspace names.
Workflows with "TestFlight External Testing" or "Notarize (macOS Only)" post-actions can be modified by Admins and App Managers only.
Environment
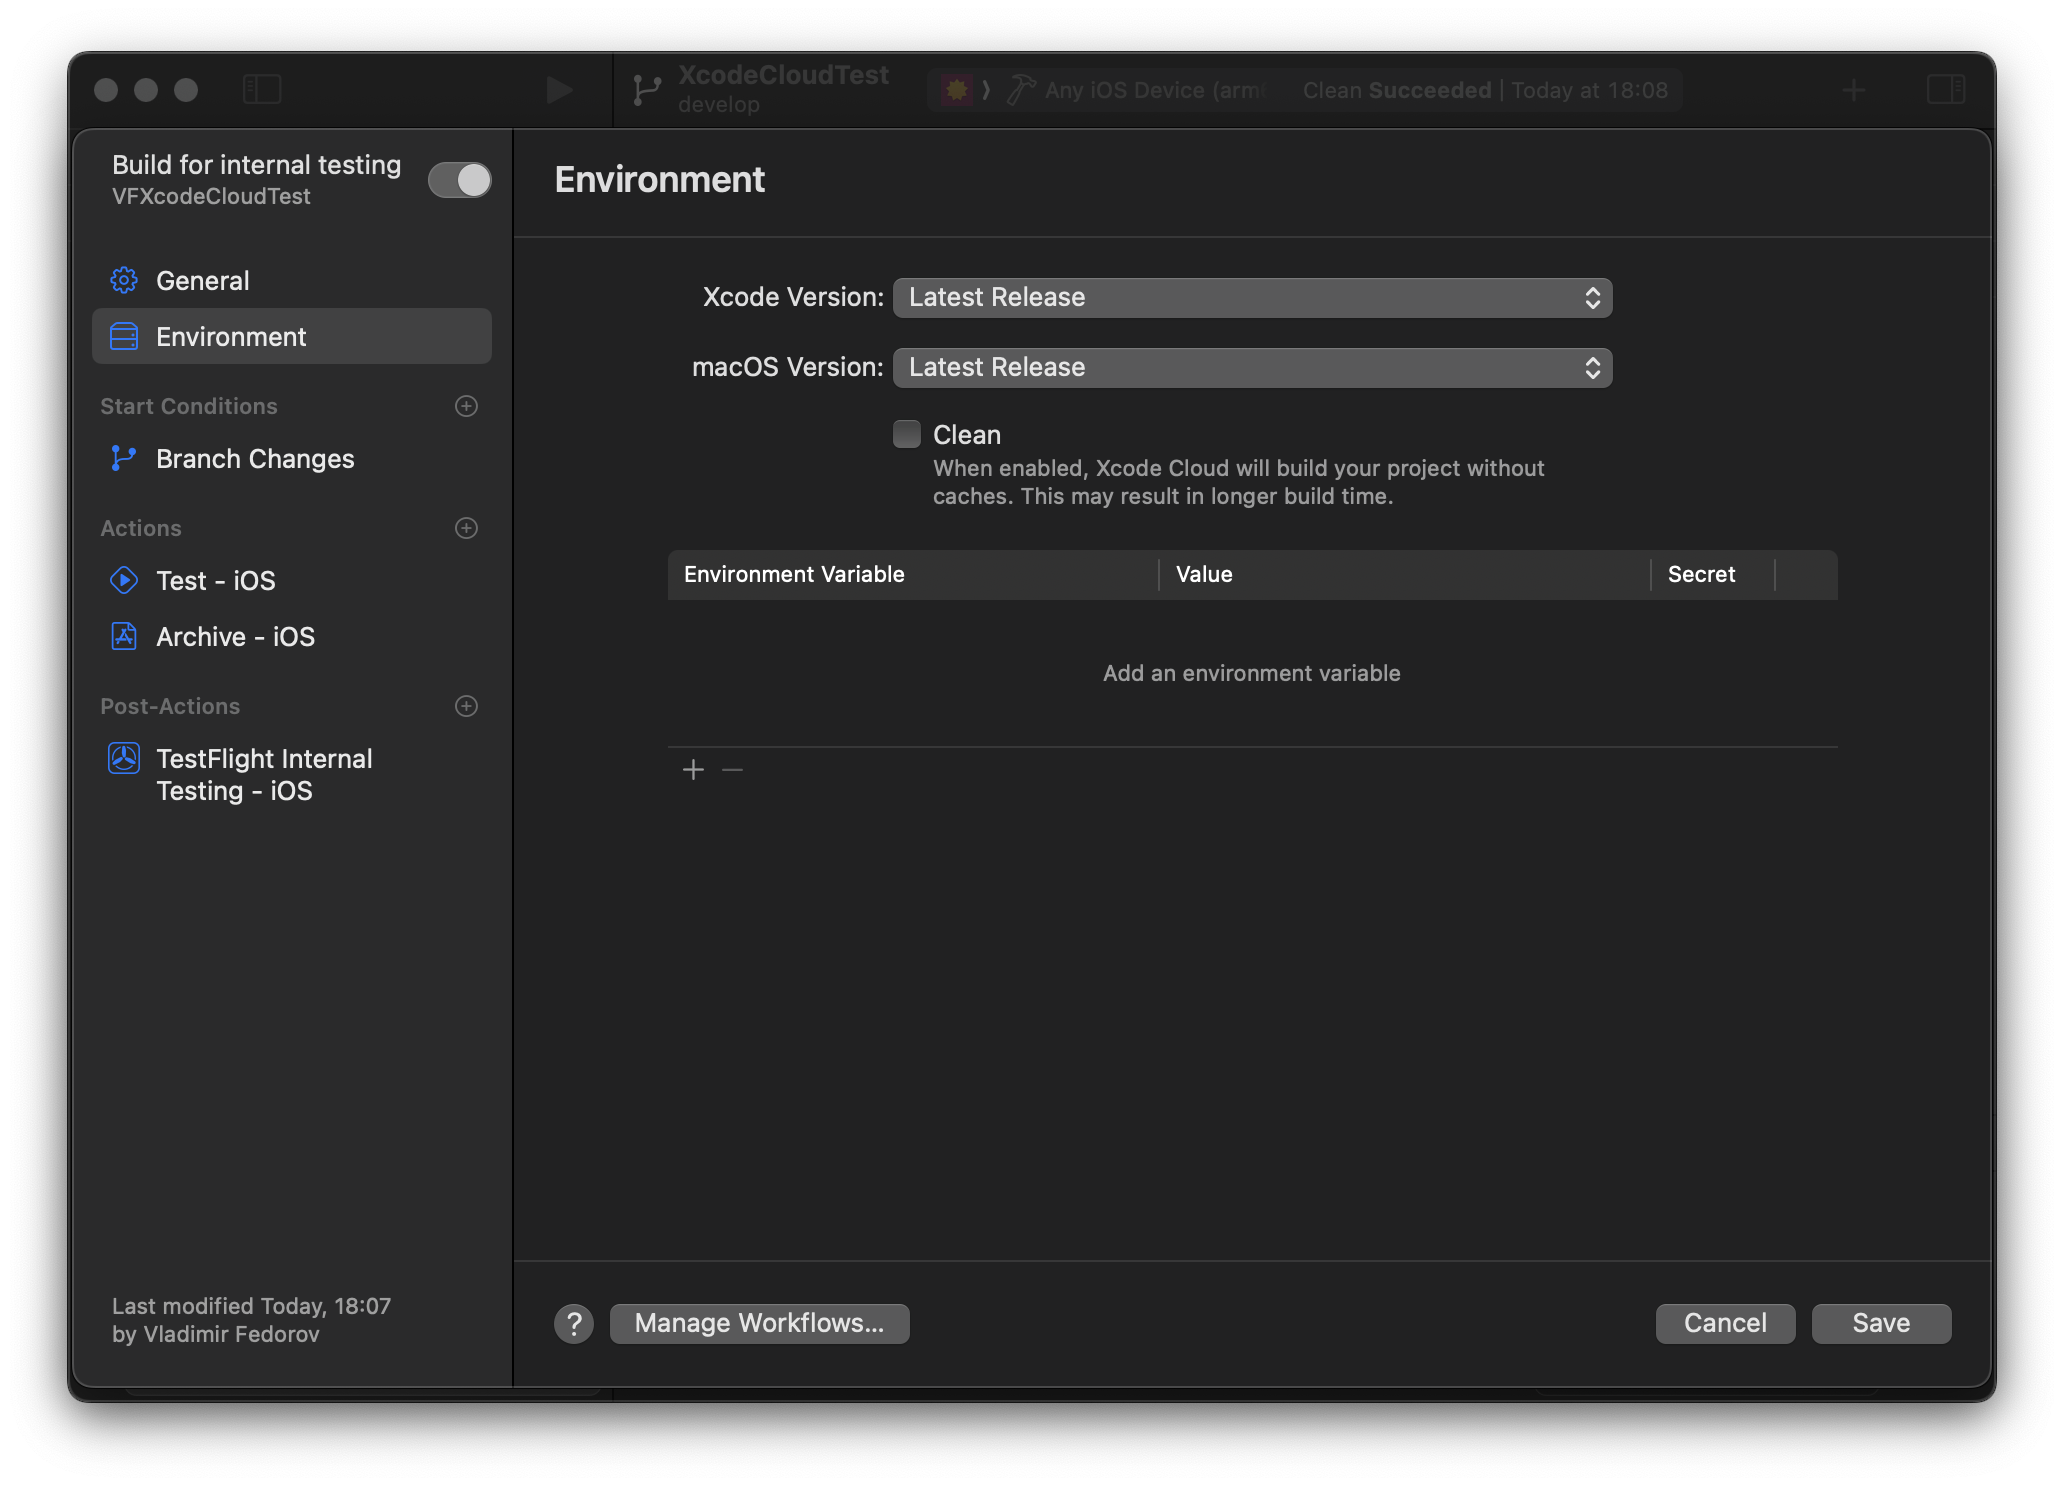
This section sets the Cloud environment, macOS, and Xcode versions for the workflow. In addition to exact macOS and Xcode versions, choosing the latest release or beta version for each parameter is possible.
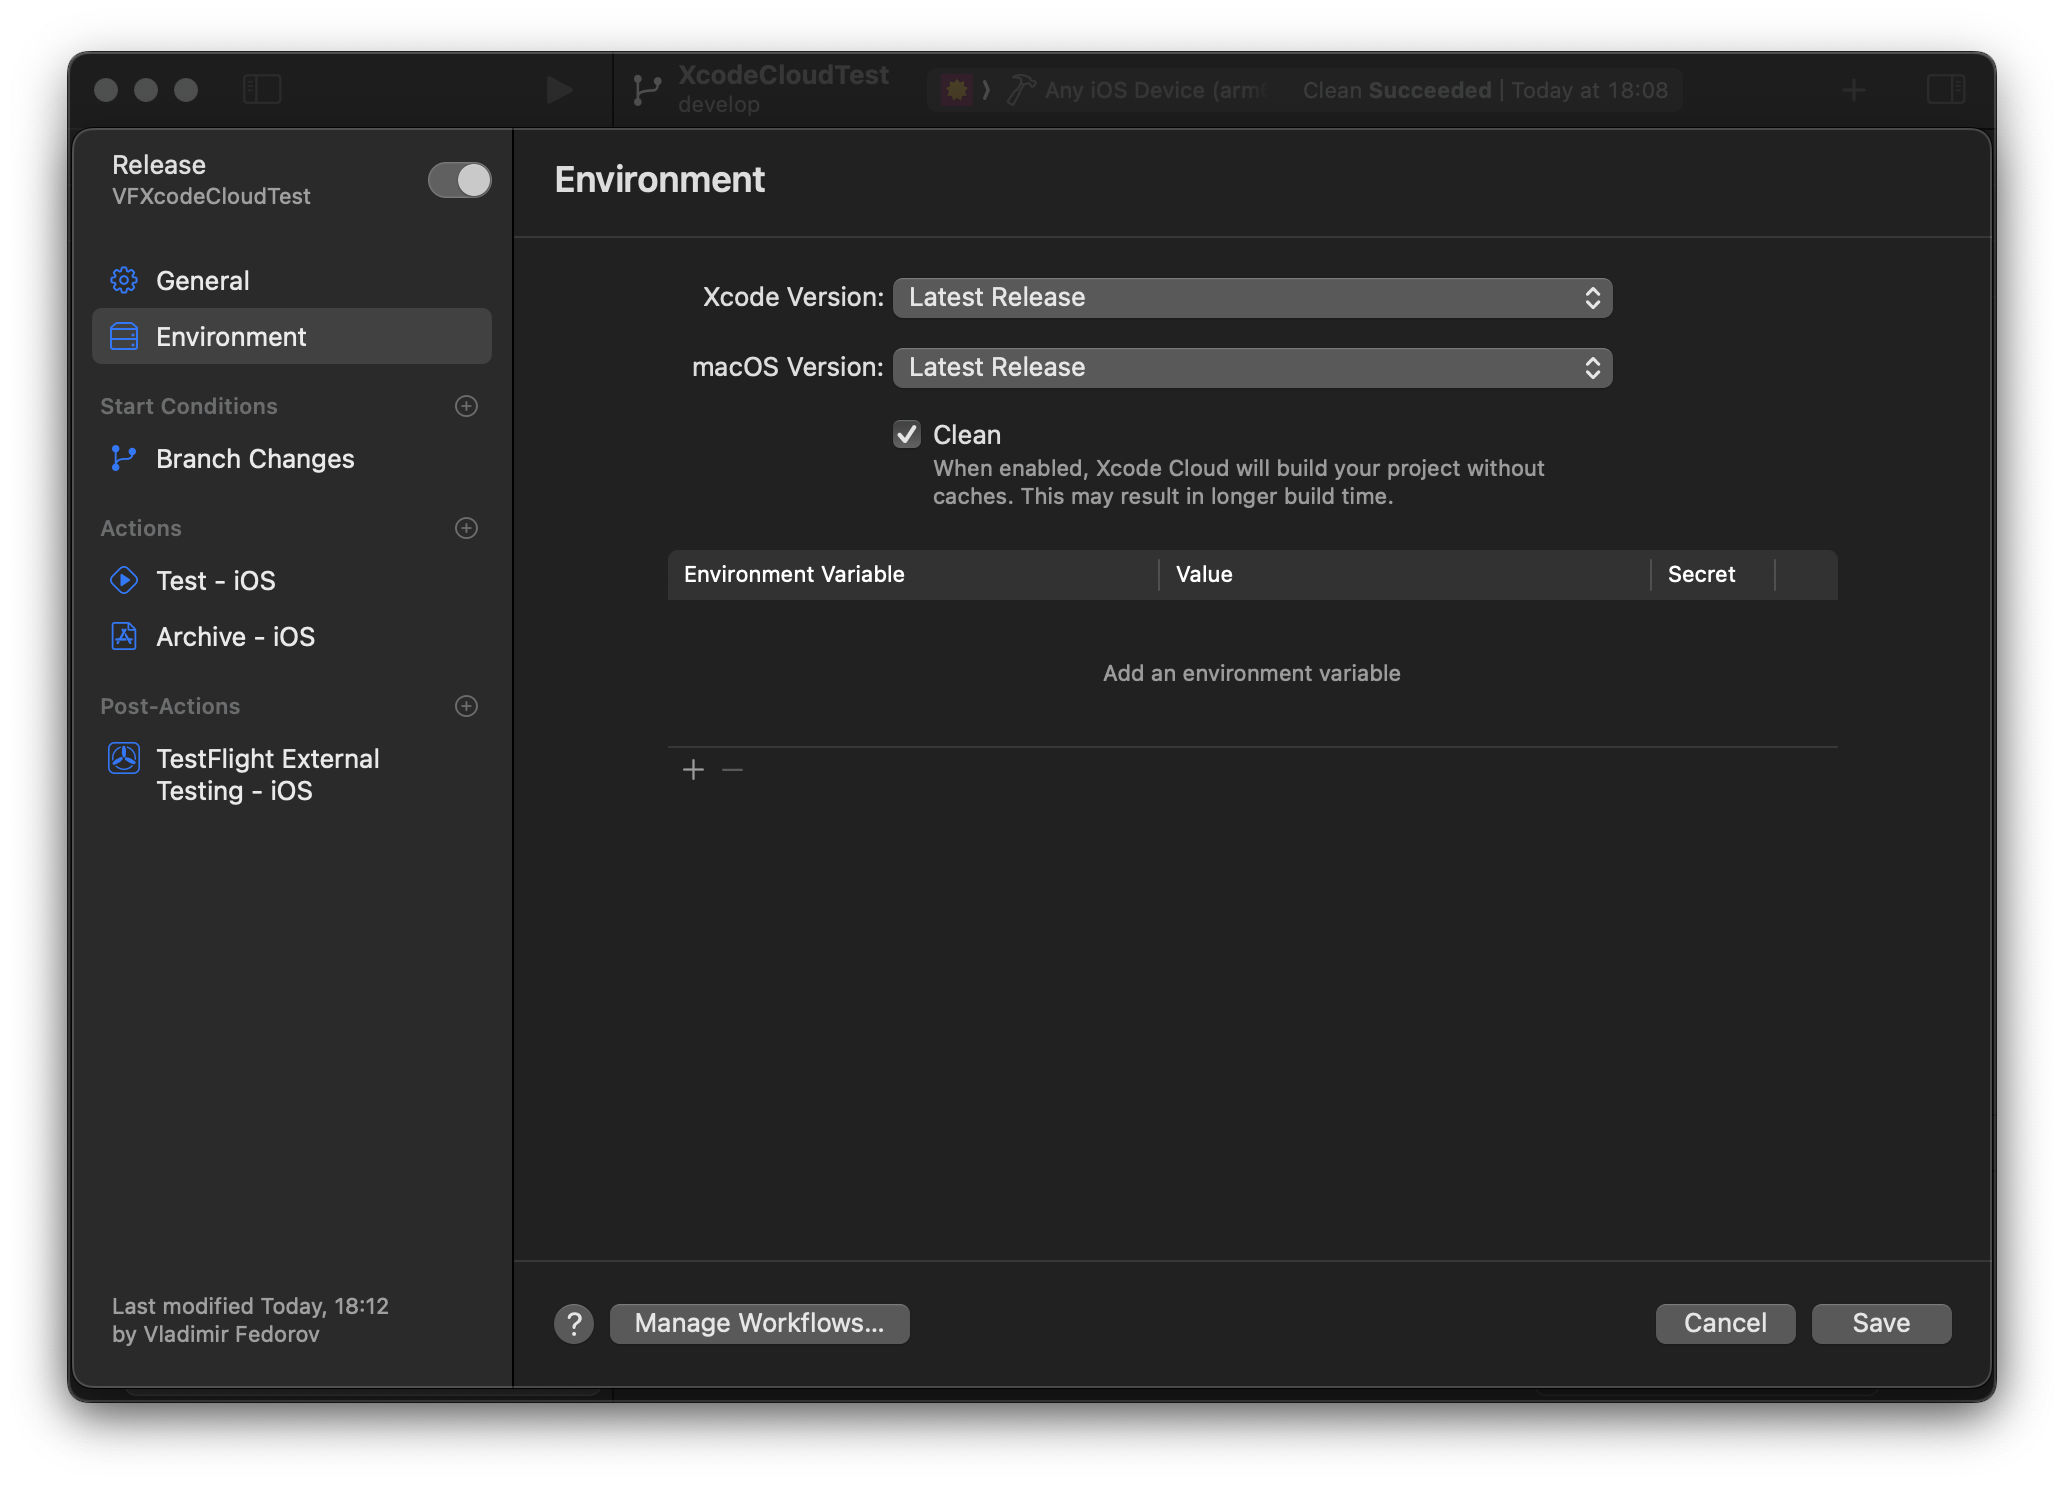
If the "Clean" checkbox is checked, Xcode Cloud builds the project without caches, and this option is required when you build for external testing or notarize a macOS application. If unchecked, Xcode Cloud securely stores each build's derived data, which helps reduce the build time.
Environment variables are accessible in the Xcode project and can be used to store dynamic values that change between workflow runs (e.g., API keys and configuration settings), control test flow by turning tests on and off depending on the workflow, and provide global access to the variable values in any part of the workflow. To store a secret value that should not appear in logs, select the "Secret" checkbox.
Start Conditions
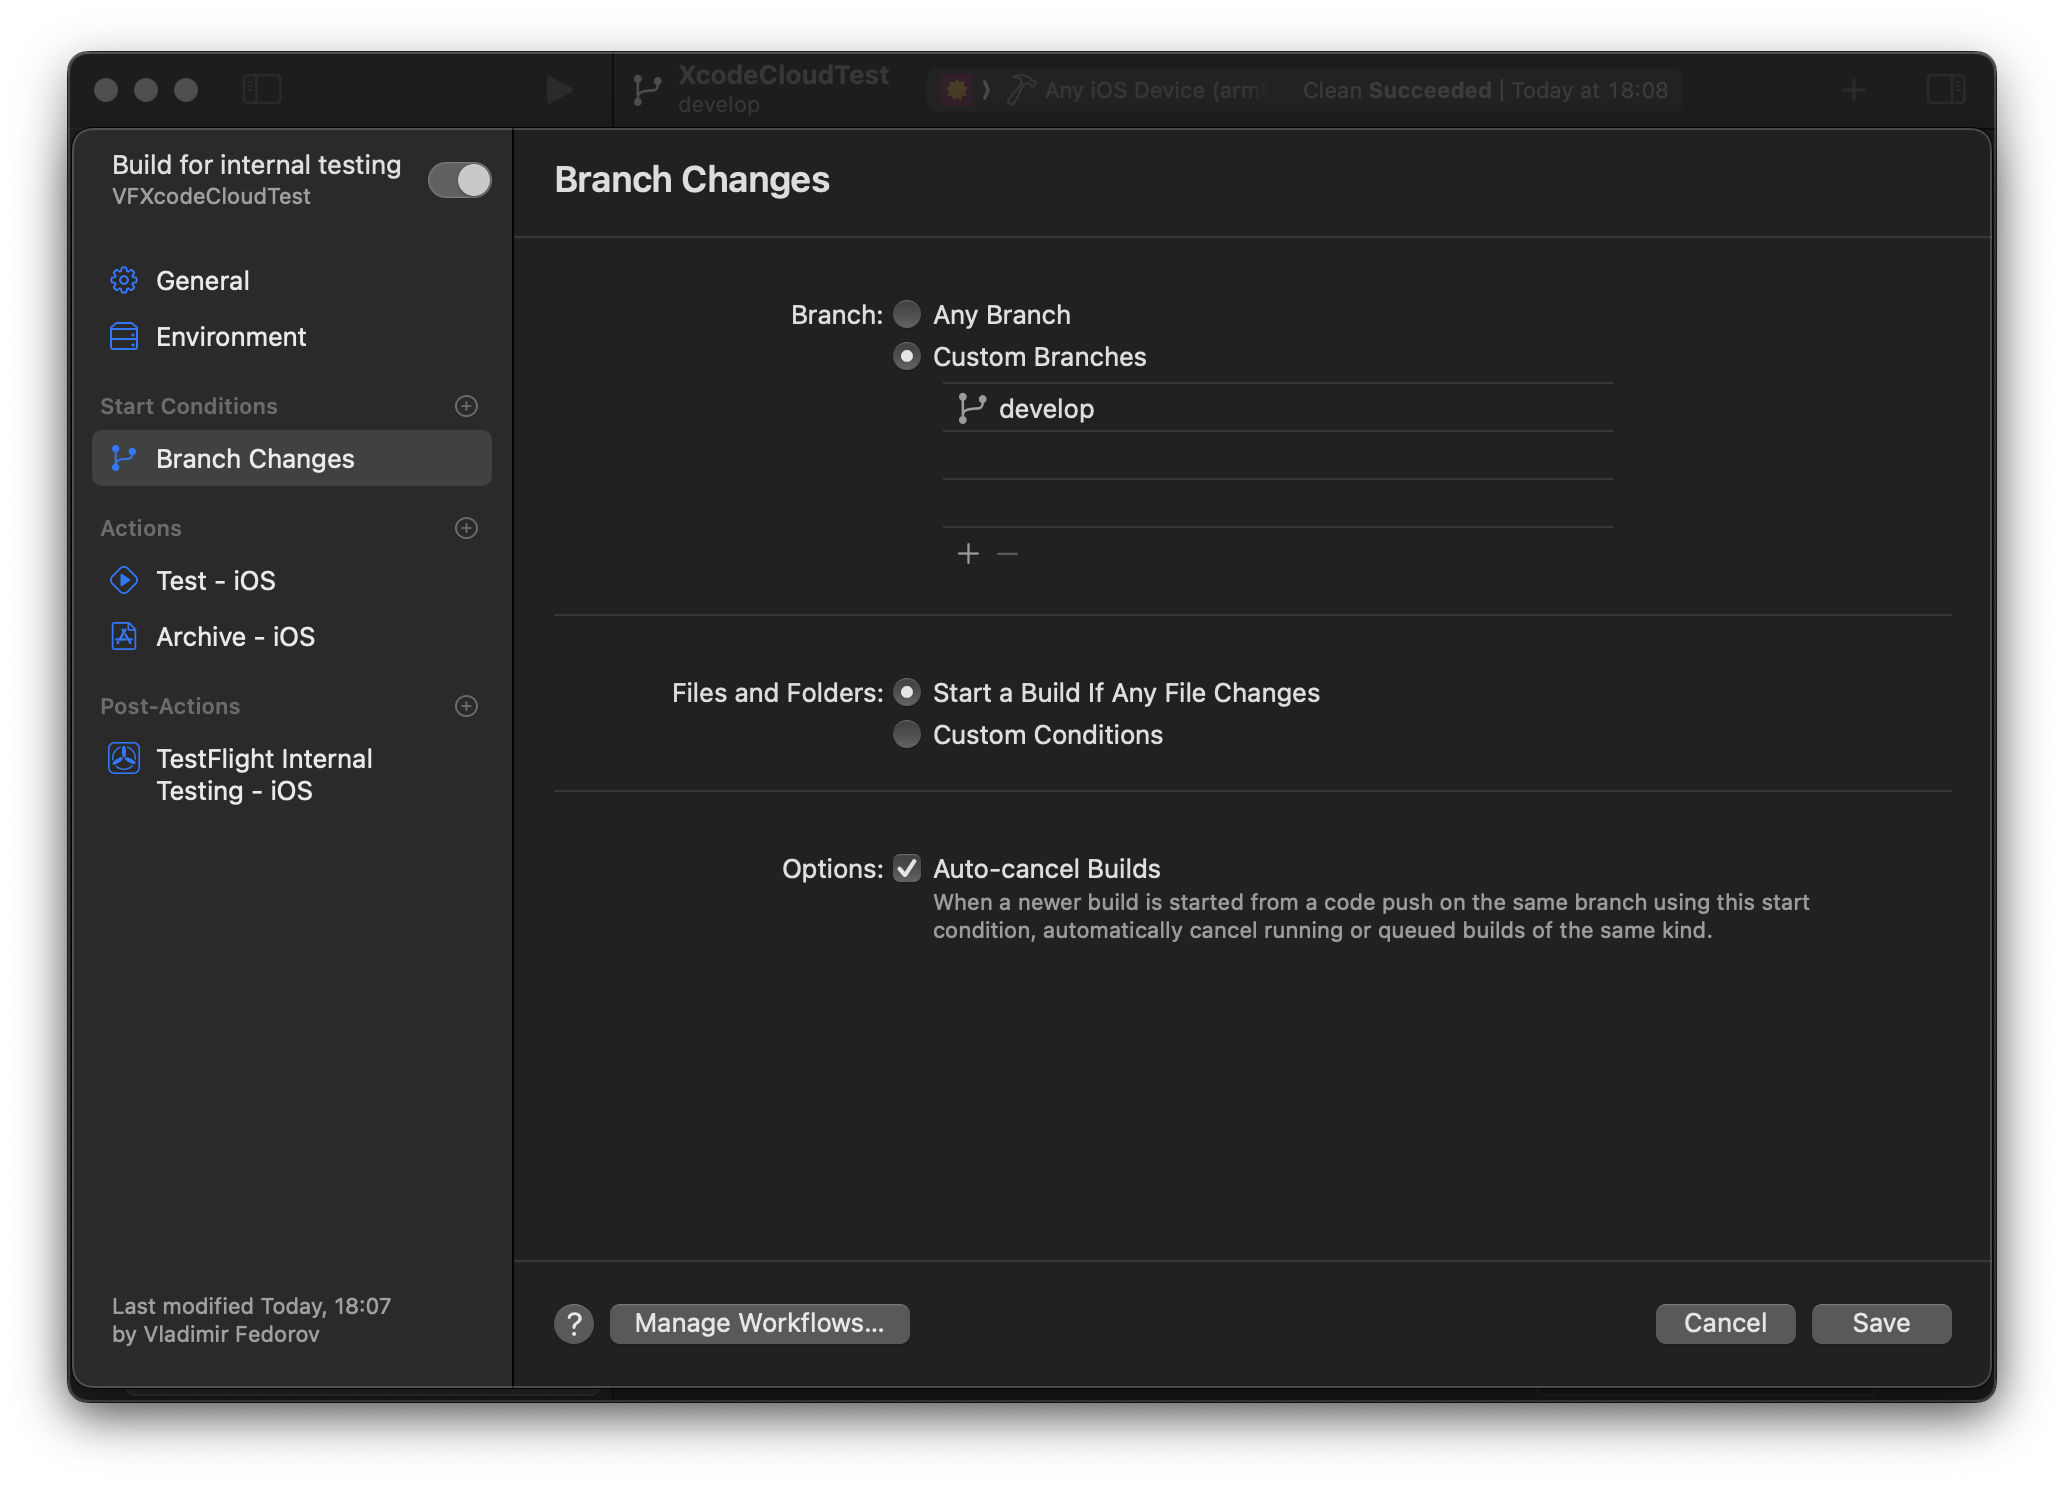
This section lets you define the events that trigger the workflow, such as code commits or pull requests.
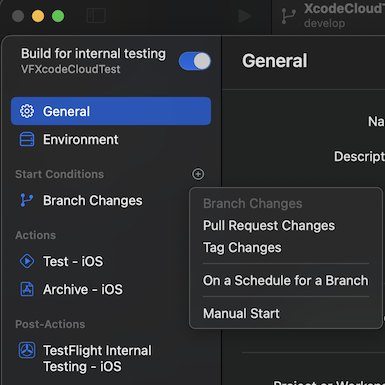
- Branch Changes - start the workflow for every change in any selected branch.
- Pull Request Changes - start the workflow when a new pull request is created or when changes are pushed to a pull request.
- Tag Changes - start when a tag is created or updated.
- On a Schedule for a Branch - start on a configured schedule; this is a convenient feature when your policies demand running scheduled actions, like automated nightly builds or sending a new build for testing once a week.
Actions

This section defines your workflow's tasks, such as compiling code, running tests, or archiving builds. Please note that each action runs separately.
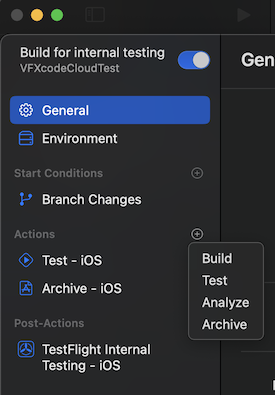
- Build - compiles the code and creates a build, making sure the project still compiles after a change. Compiling builds for Any device or simulator and macOS builds for macOS or Mac Catalyst destinations is possible.
- Test - executes unit tests and UI tests to verify a change. This action allows the selection of specific devices for testing or keeping a set of predefined recommended devices representing a cross-section of screen sizes.
- Analyse - this action runs the
xcodebuild analyzecommand to perform static code analysis, creating build logs available as artifacts of the action. - Archive - packages app for distribution. You can choose between different signing options: None, TestFlight (Internal Testing Only), and TestFlight and App Store.
-
TestFlight (Internal Testing Only) - Sign the app for internal testing; the build appears immediately on TestFlight if you choose "TestFlight Internal Testing.” You don't have to do clean builds for that, but you need to set up at least one group of internal testers on the App Store portal to enable this step.
The builds signed for internal testing can't be published on the App Store, and it's worth using this option for code that hasn't been thoroughly tested and accepted for publishing.
-
TestFlight and App Store - signs the app for App Store and external beta testing. You need to check the "Clean" build option in Environment settings, and you also have to set up at least one external tester or one group of external testers on the App Store portal before enabling this step. Please note this step is subject to beta review.
The builds signed for TestFlight and App Store can be published on the App Store; this option will be best for well-tested code in
release/branches.This option requires "Restrict Editing" on the "General" tab to be enabled; this way, the workflow can only be modified by Admins and App Managers.
-
Xcode Cloud creates a temporary build environment for each action, clones the source code from the connected repository, resolves dependencies, runs custom build scripts, performs the selected action, and saves artifacts. It means workflows don't need the "Build" action before running tests, analyzing the code, or archiving the app.
Post-Actions
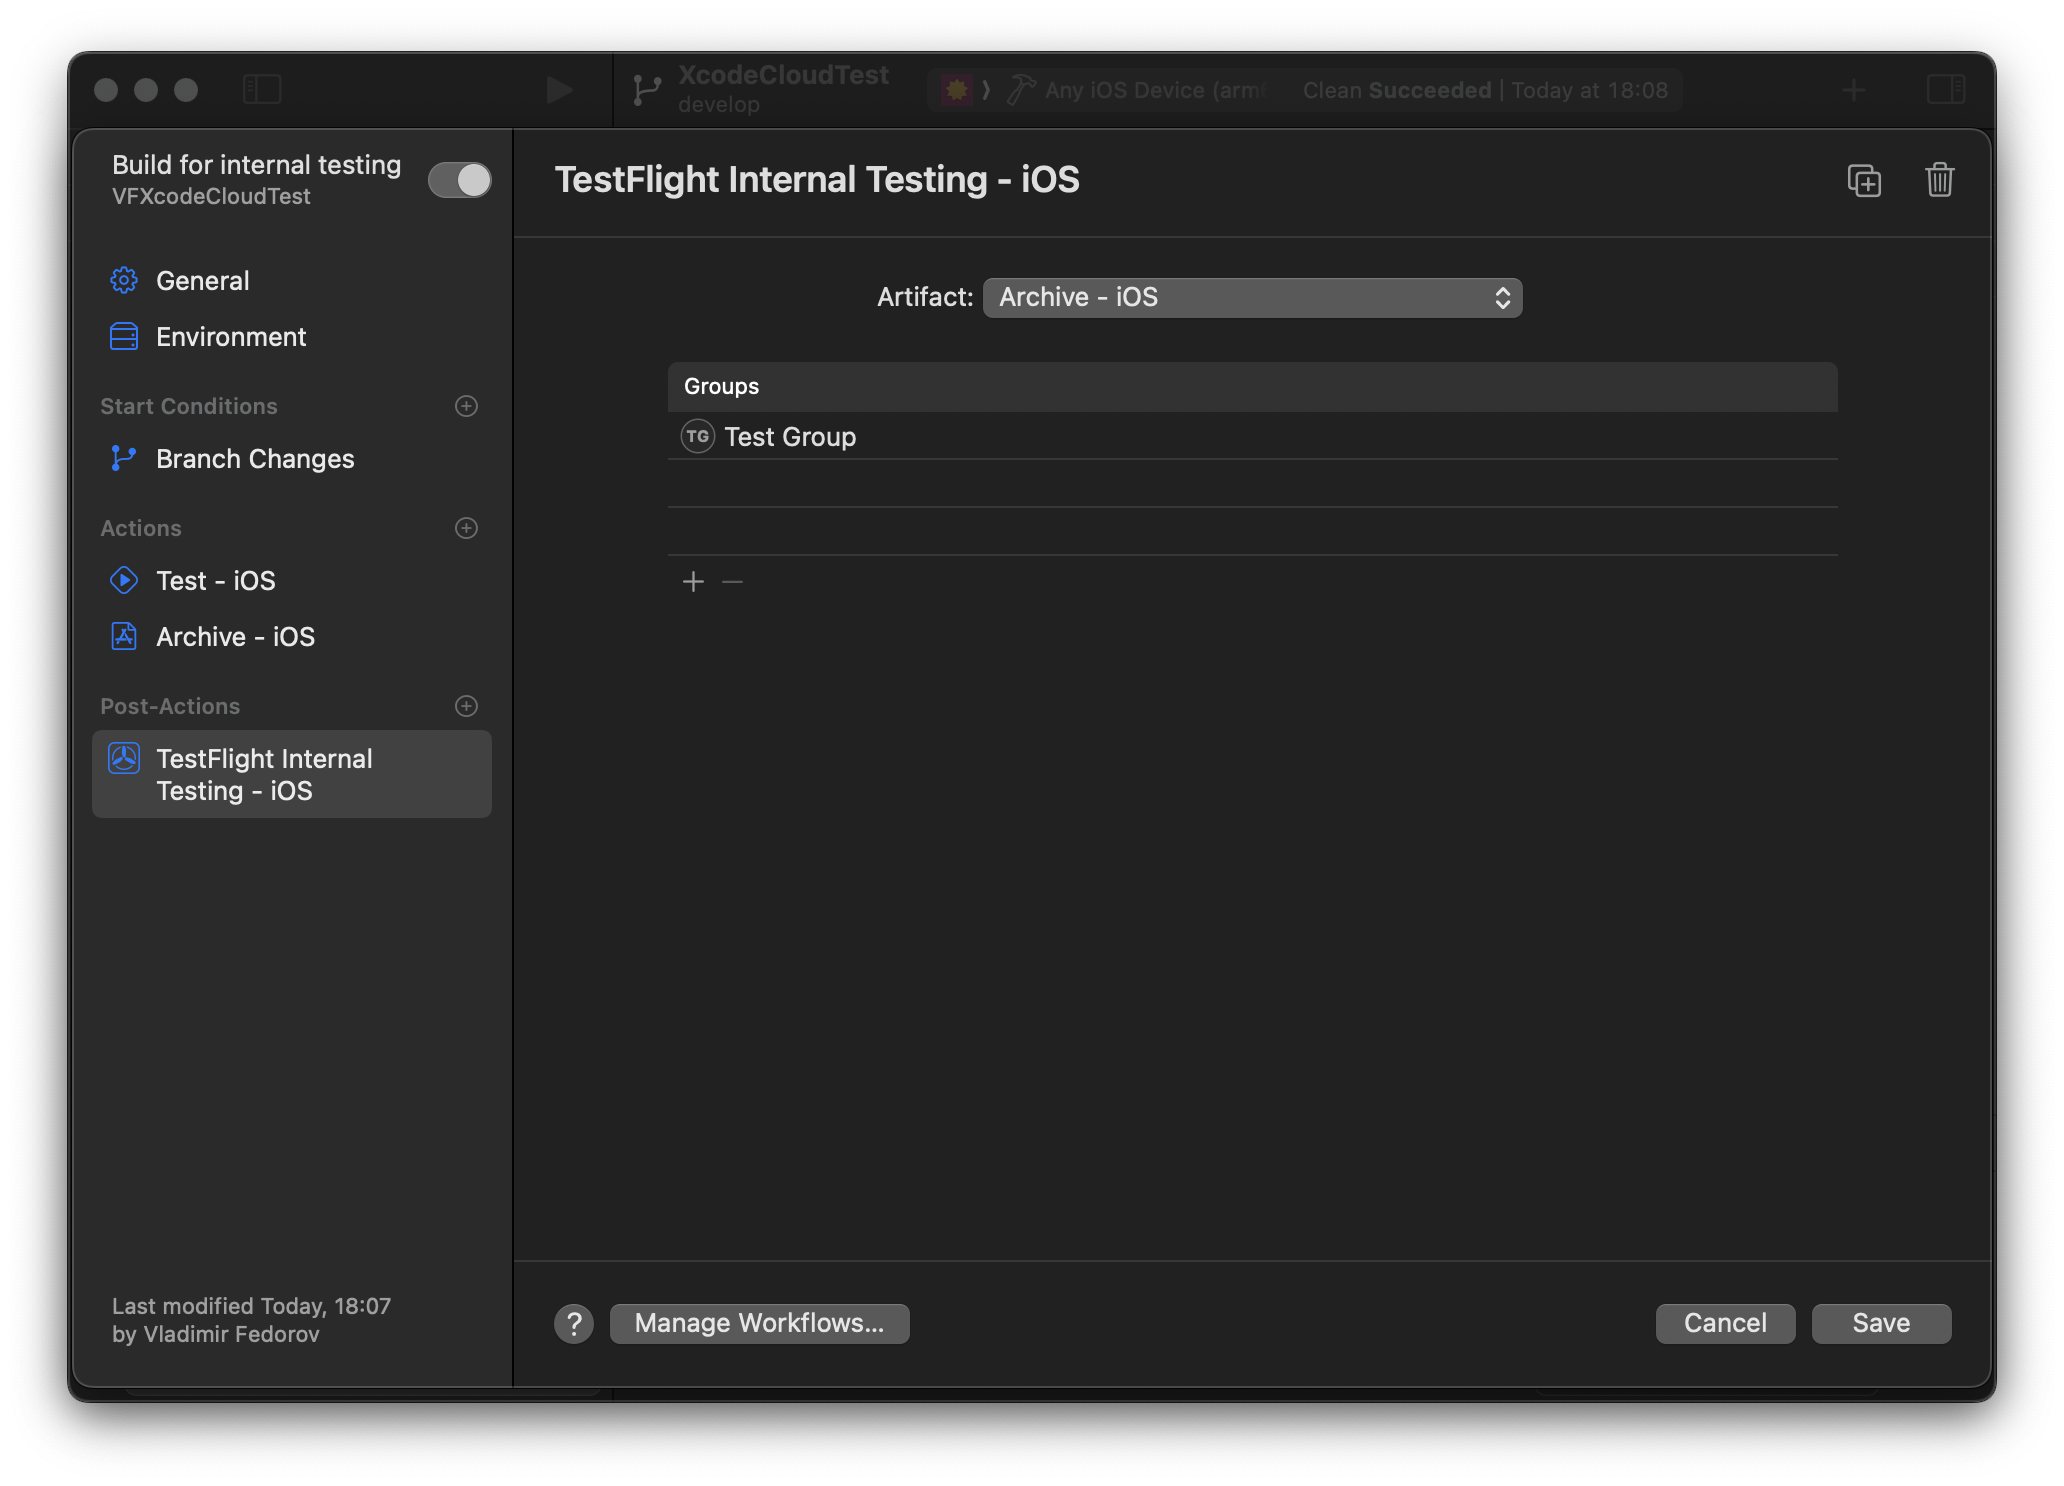
In this section, you can define any steps that should occur after the main actions, like sending notifications or processing of build artifacts.
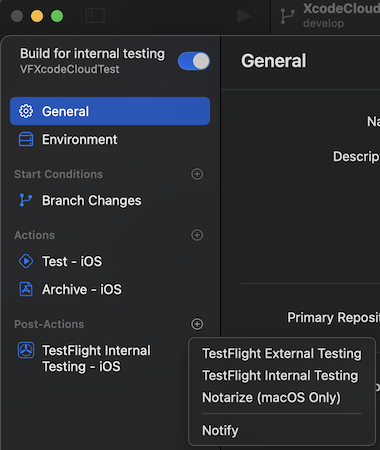
- TestFlight External Testing - allows to send an artifact from the "Actions" step to Test Flight for external testing.
- TestFlight Internal Testing - allows the upload of an artifact from the "Actions" step to Test Flight for internal testing.
- Notarize (macOS Only) - Check the archive for malicious content and code-signing issues.
- Notify - notification settings for successes and failures:
- Build Success:
- All - sends notifications for every successful build.
- Only Fixes - sends notifications only if the build status changes to success from the previous failure.
- Don't Notify - don't send notifications in case of success.
- Build Failure:
- All - sends notifications for every failed build.
- Only Breaks - sends notifications only if the build status changes to failure from previous success.
- Don't Notify - don't send notifications if the build fails. You can set up additional emails and connect Slack accounts if you need to; still, you can skip this step if you need to notify only the users listed in the internal or external test groups of the app and you have added one of the previous items in your workflow: TestFlight always sends emails and push notifications to selected test groups.
- Build Success:
Adding “What To Test” Notes
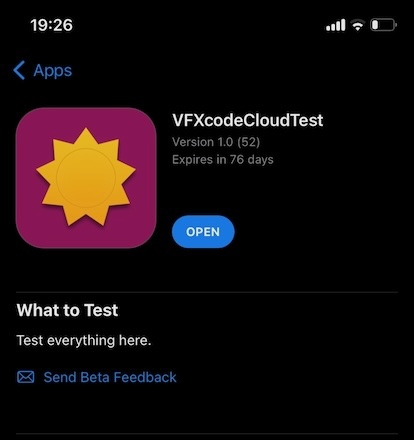
To add "What to test" notes to a Test Flight build, add a TestFlight folder to the project, and create one or more WhatToTest.<locale>.txt files in it (for example, WhatToTest.en-US.txt): the content of these files is displayed in the "What to Test" section in TestFlight application.
How to use custom build scripts
Xcode Cloud supports custom build scripts. To add a custom build script, add a folder ci_scripts to the same directory as the Xcode project or workspace. Xcode Cloud recognizes three scripts:
ci_post_clone.sh- runs after Xcode Cloud clones your Git repository and can be used to run actions before Xcode Cloud resolves project dependencies.ci_pre_xcodebuild.sh- runs before Xcode Cloud runs thexcodebuildcommand; it can be used to compile additional dependencies.ci_post_xcodebuild.sh- runs after Xcode Cloud runs thexcodebuildcommand. Even if thexcodebuildcommand fails, it can be used to upload artifacts to storage or another service.
The use of Carthage and CocoaPods
Xcode Cloud environment doesn't include CocoaPods or Carthage, but when it is impossible to migrate dependencies to Swift Package Manager, you can install them with Homebrew.
Add CocoaPods or Carthage commands to ci_post_clone.sh script to support these dependencies:
CocoaPods:
# Install CocoaPods using Homebrew.
brew install cocoapods

# Install dependencies you manage with CocoaPods.
pod install
Carthage:
# Install Carthage using Homebrew.
brew install carthage

# Install dependencies you manage with Carthage.
carthage update --use-xcframeworks
Build Groups in TestFlight
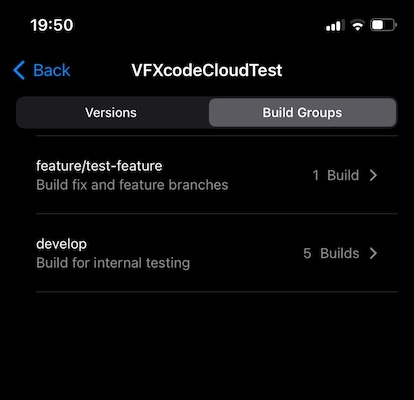
When Xcode Cloud makes a build from code in a specific branch and uploads the build to TestFlight, it automatically creates a new Build Group for the branch, making distinguishing one build from another easier.
Implementing Git Flow Workflows
Now, when we set up Xcode Cloud to work with the project's repository, we can create workflows for each Git Flow workflow.
- While running unit tests on every commit is not practical, we are going to run unit tests for pull requests from
feature/andfix/branches to thedevelopbranch. - When the
developbranch changes (e.g., after a PR is merged or a commit to the branch), we want to ensure we run unit tests, make a TestFlight build, and notify internal testers. - When a
release/branch changes, the workflow runs unit tests, creates a binary signed for distribution and notifies external users about it.
Running unit tests when code is pushed to pull requests targeting the develop branch
This workflow runs when a pull request from feature/ or fix/ branch targeting the develop branch changes to ensure new code won't cause regression.
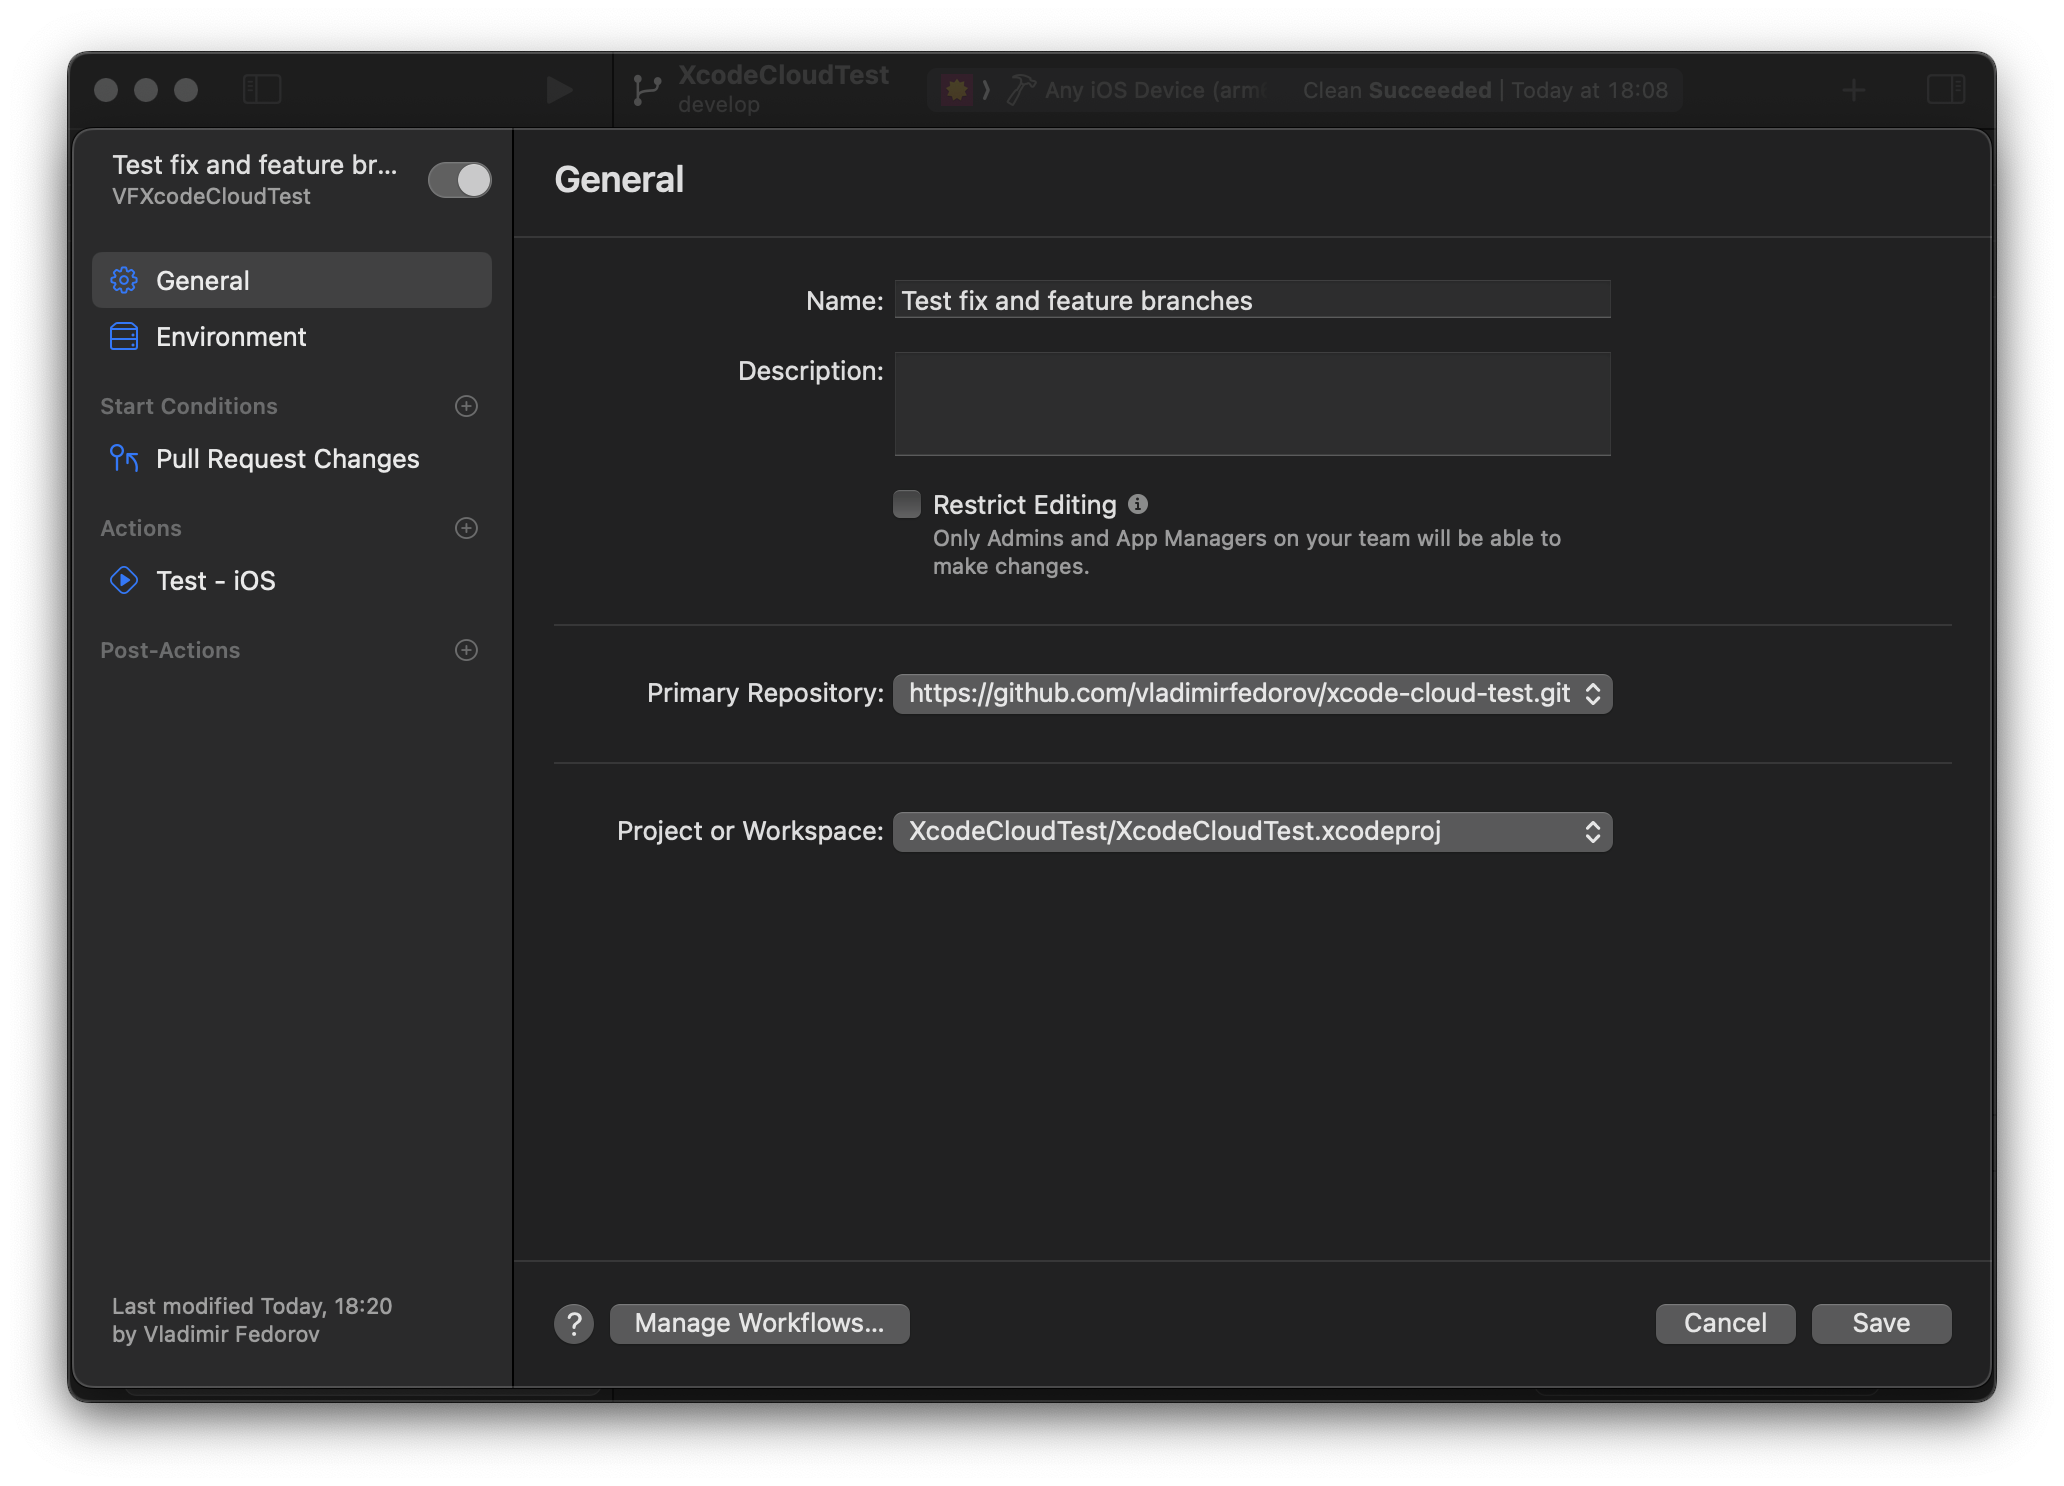
In "Start Conditions”, we need to add "Pull Request Changes" and select source branches and a target branch. For source branches, we can type "feature/“, and Xcode prompts to choose whether the name should start with "feature/" or whether it should be the name of the branch; we need to select "branches beginning with feature/" to include all feature branches. In the "Target Branch" section, let's add "develop" as the name of the branch.
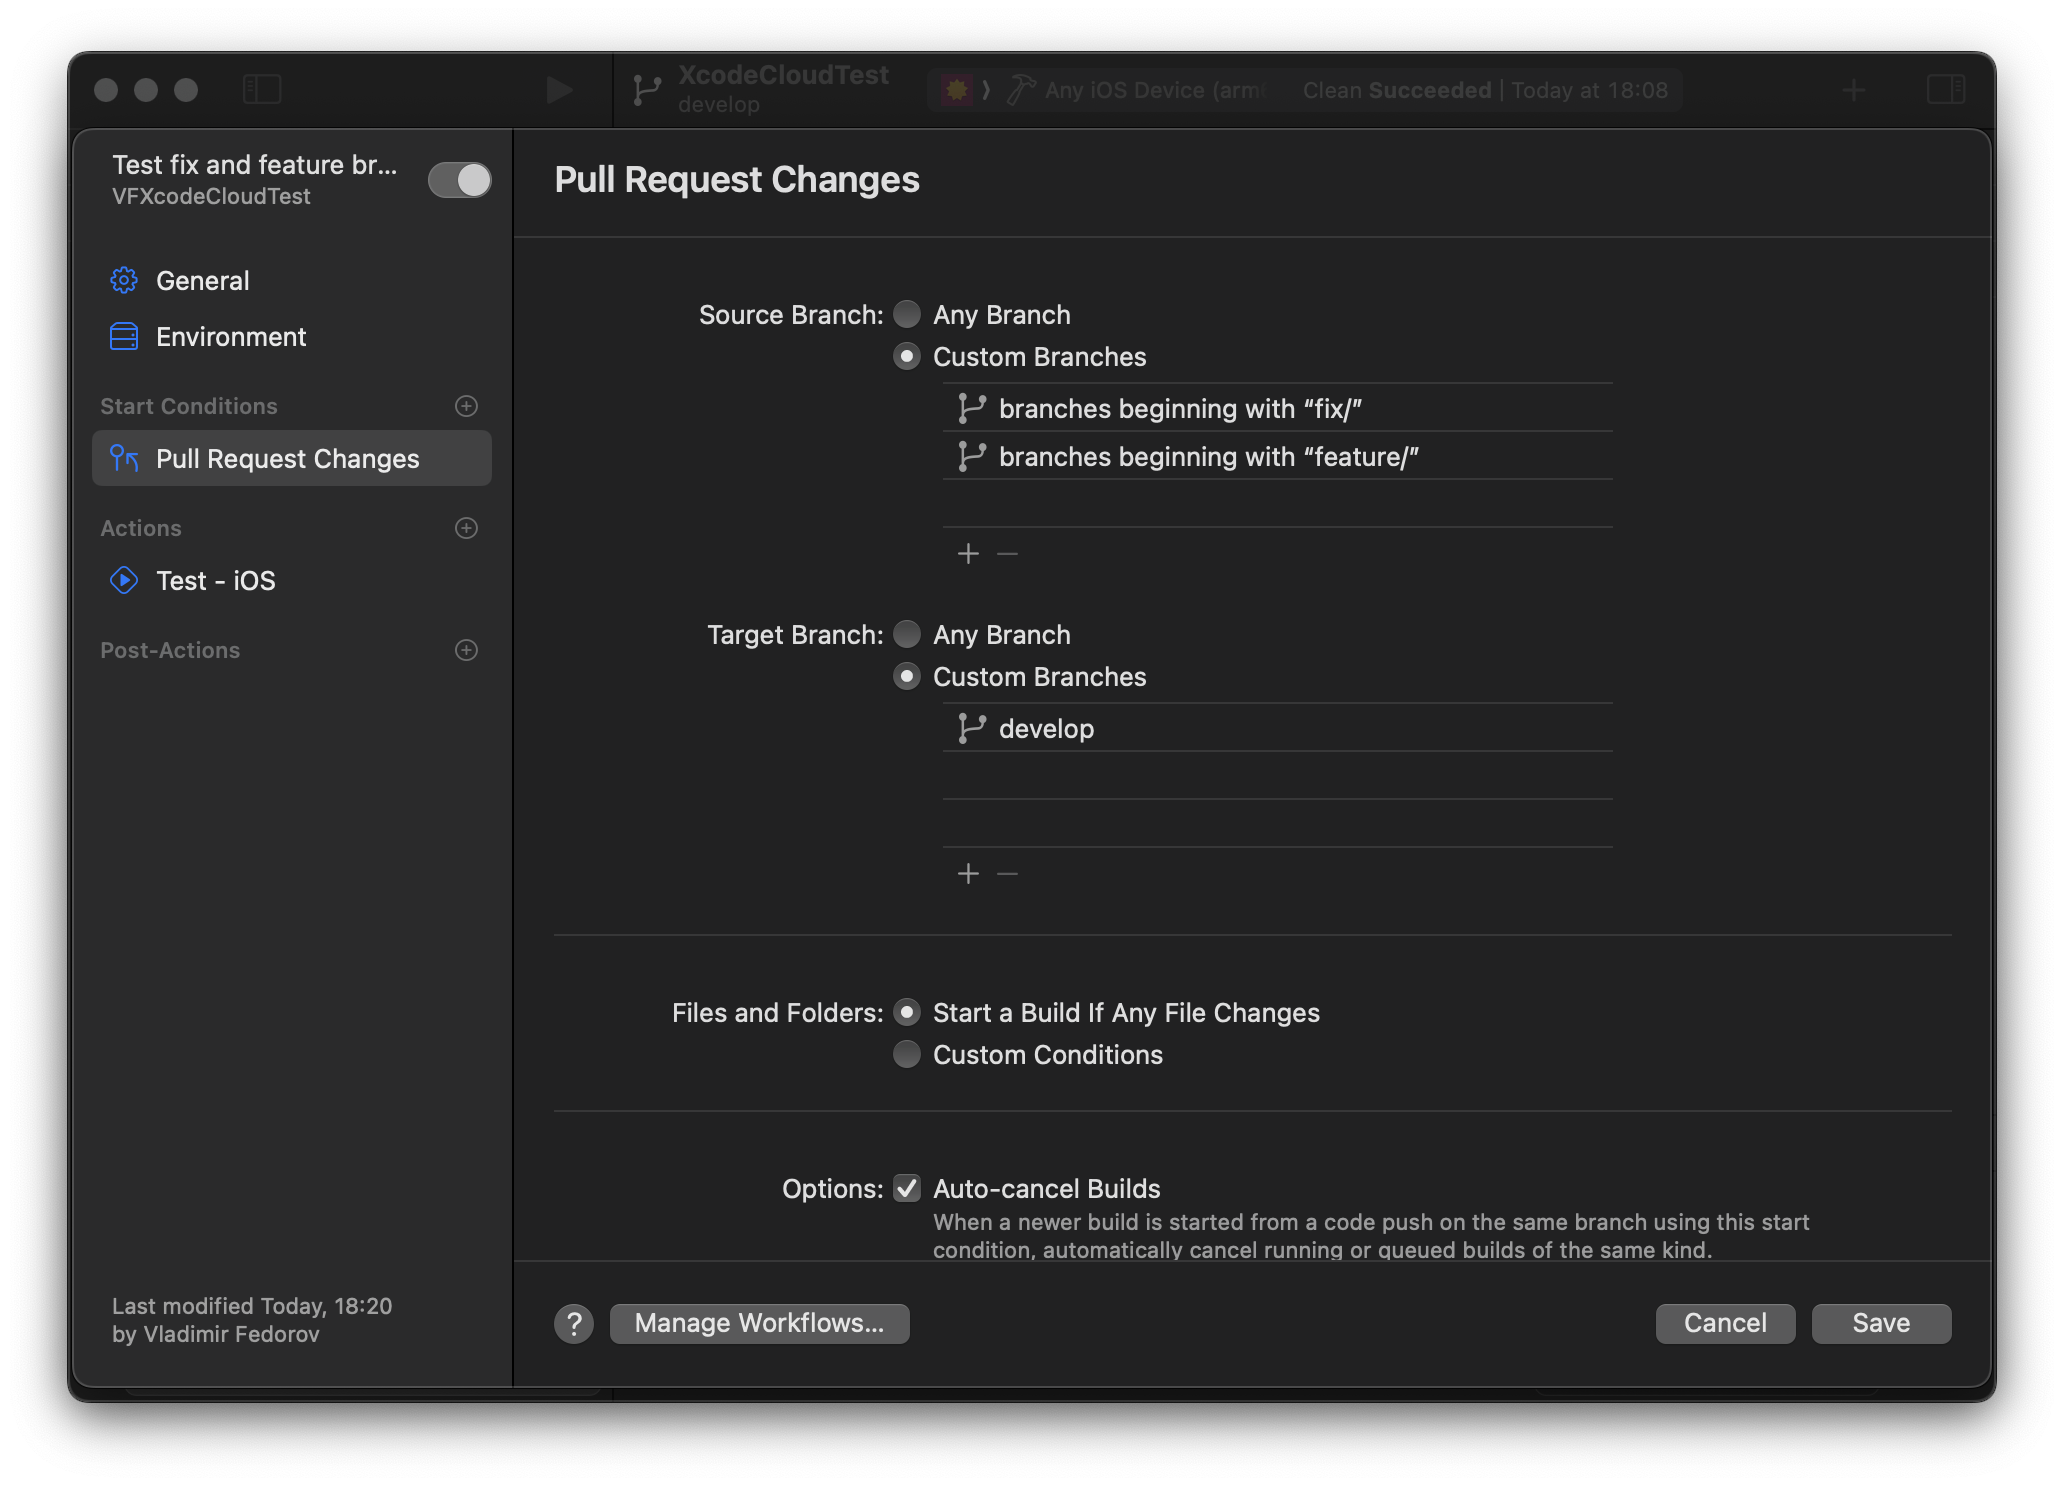
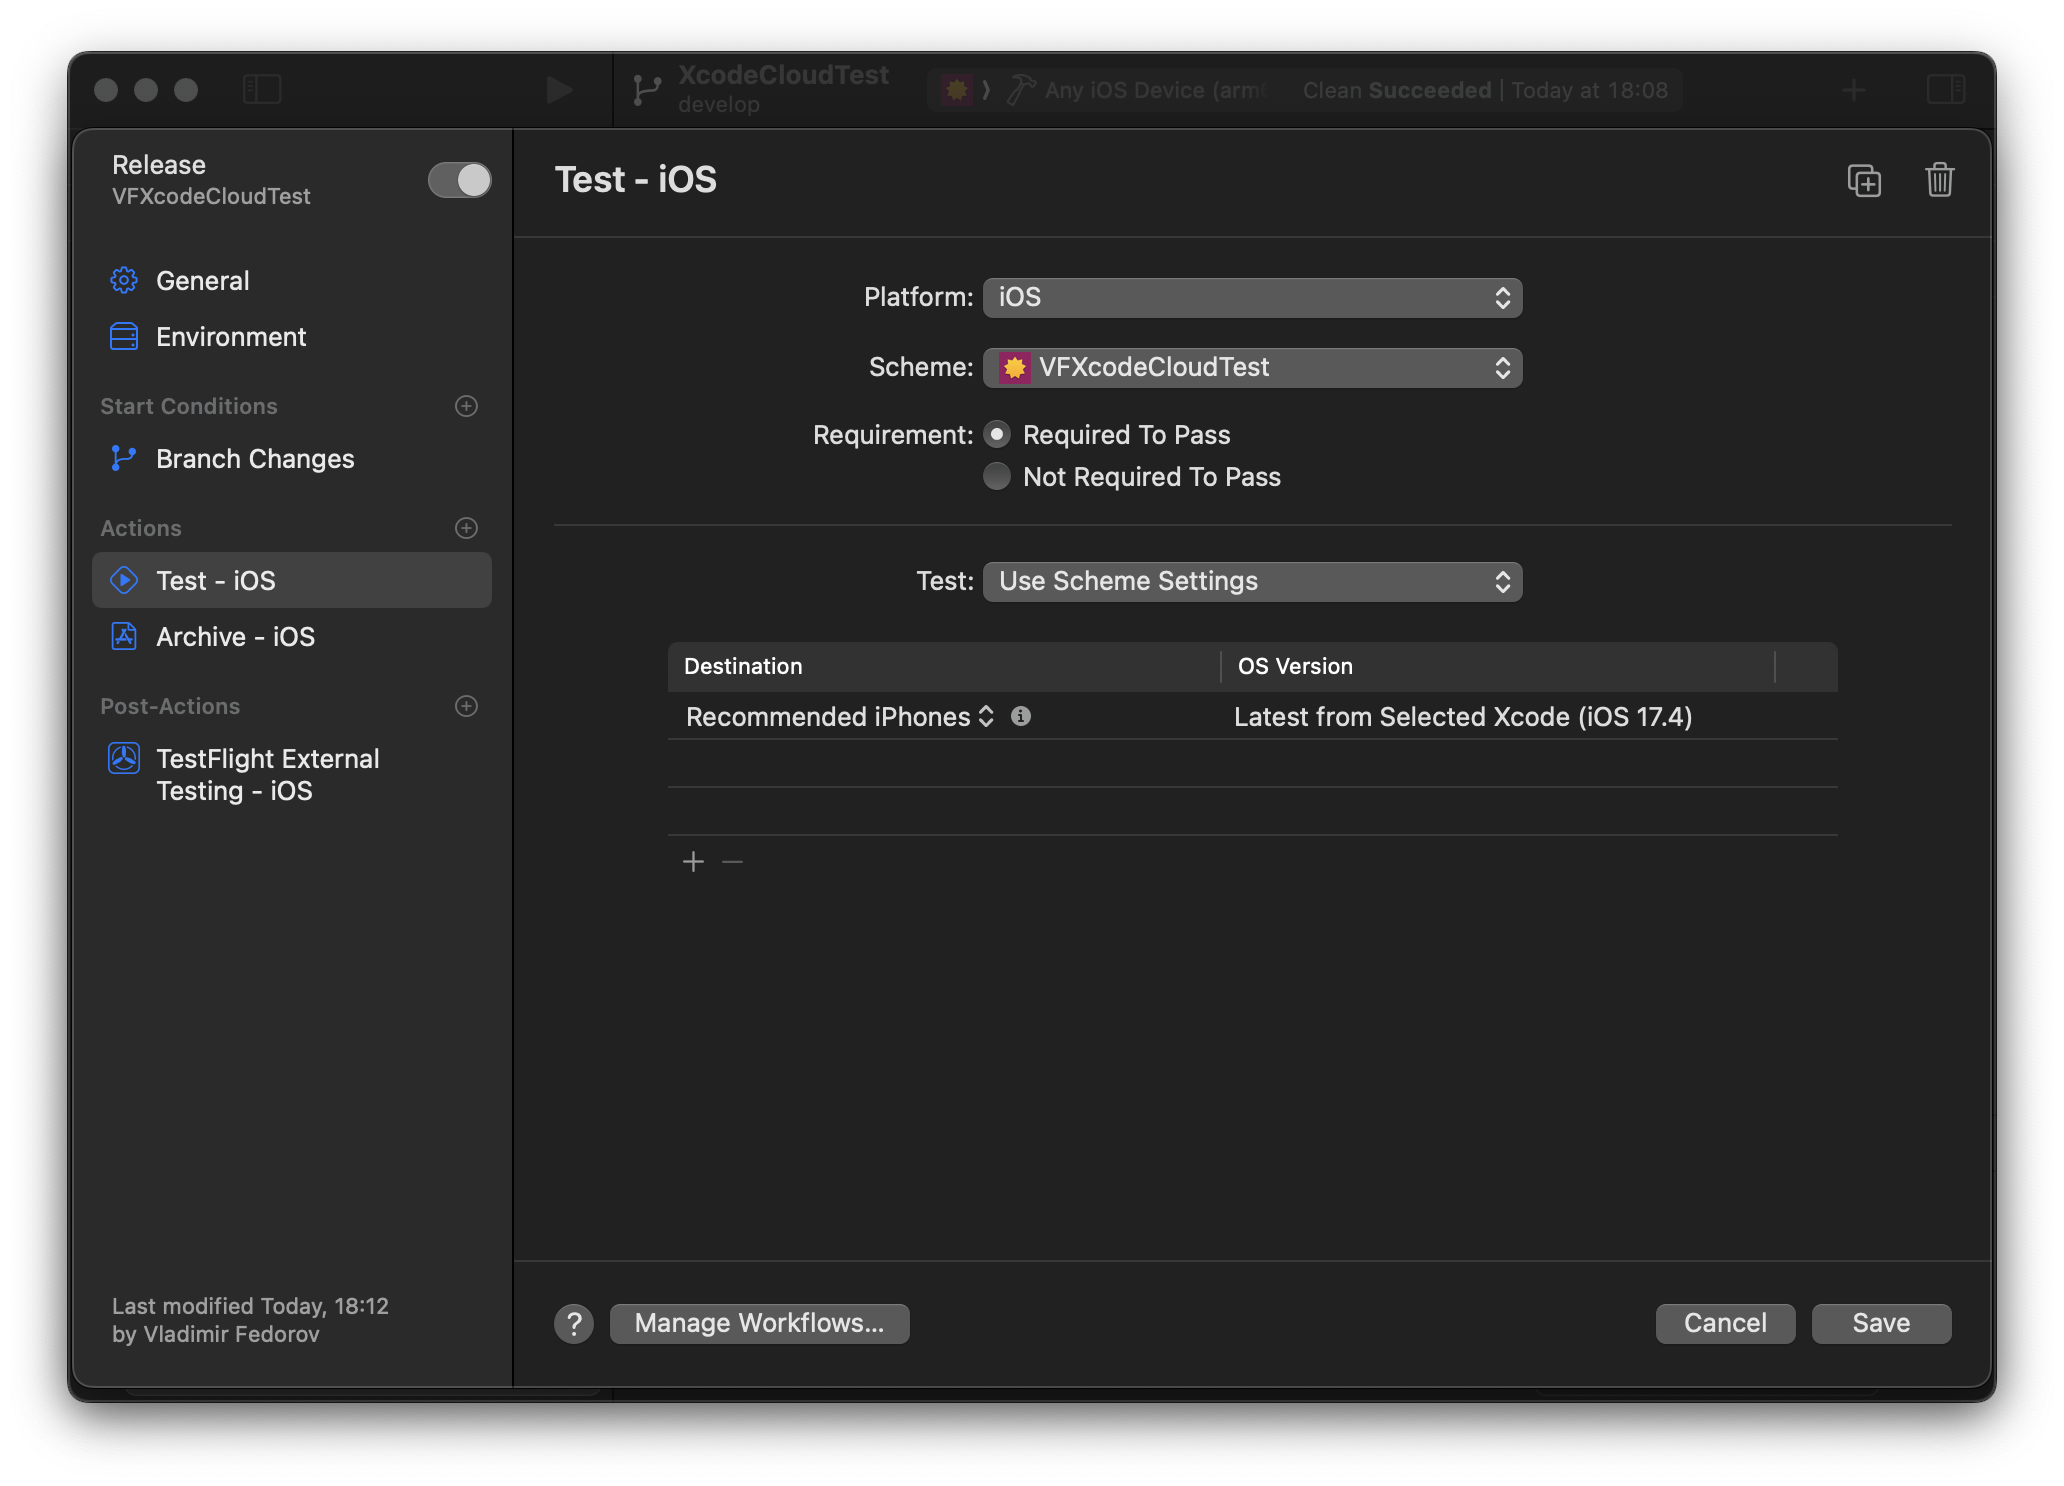
In "Actions”, we add the "Test - iOS" action to run tests; we're not going to save artifacts or upload them to TestFlight in this workflow. Here, we keep the recommended destination and OS Version.
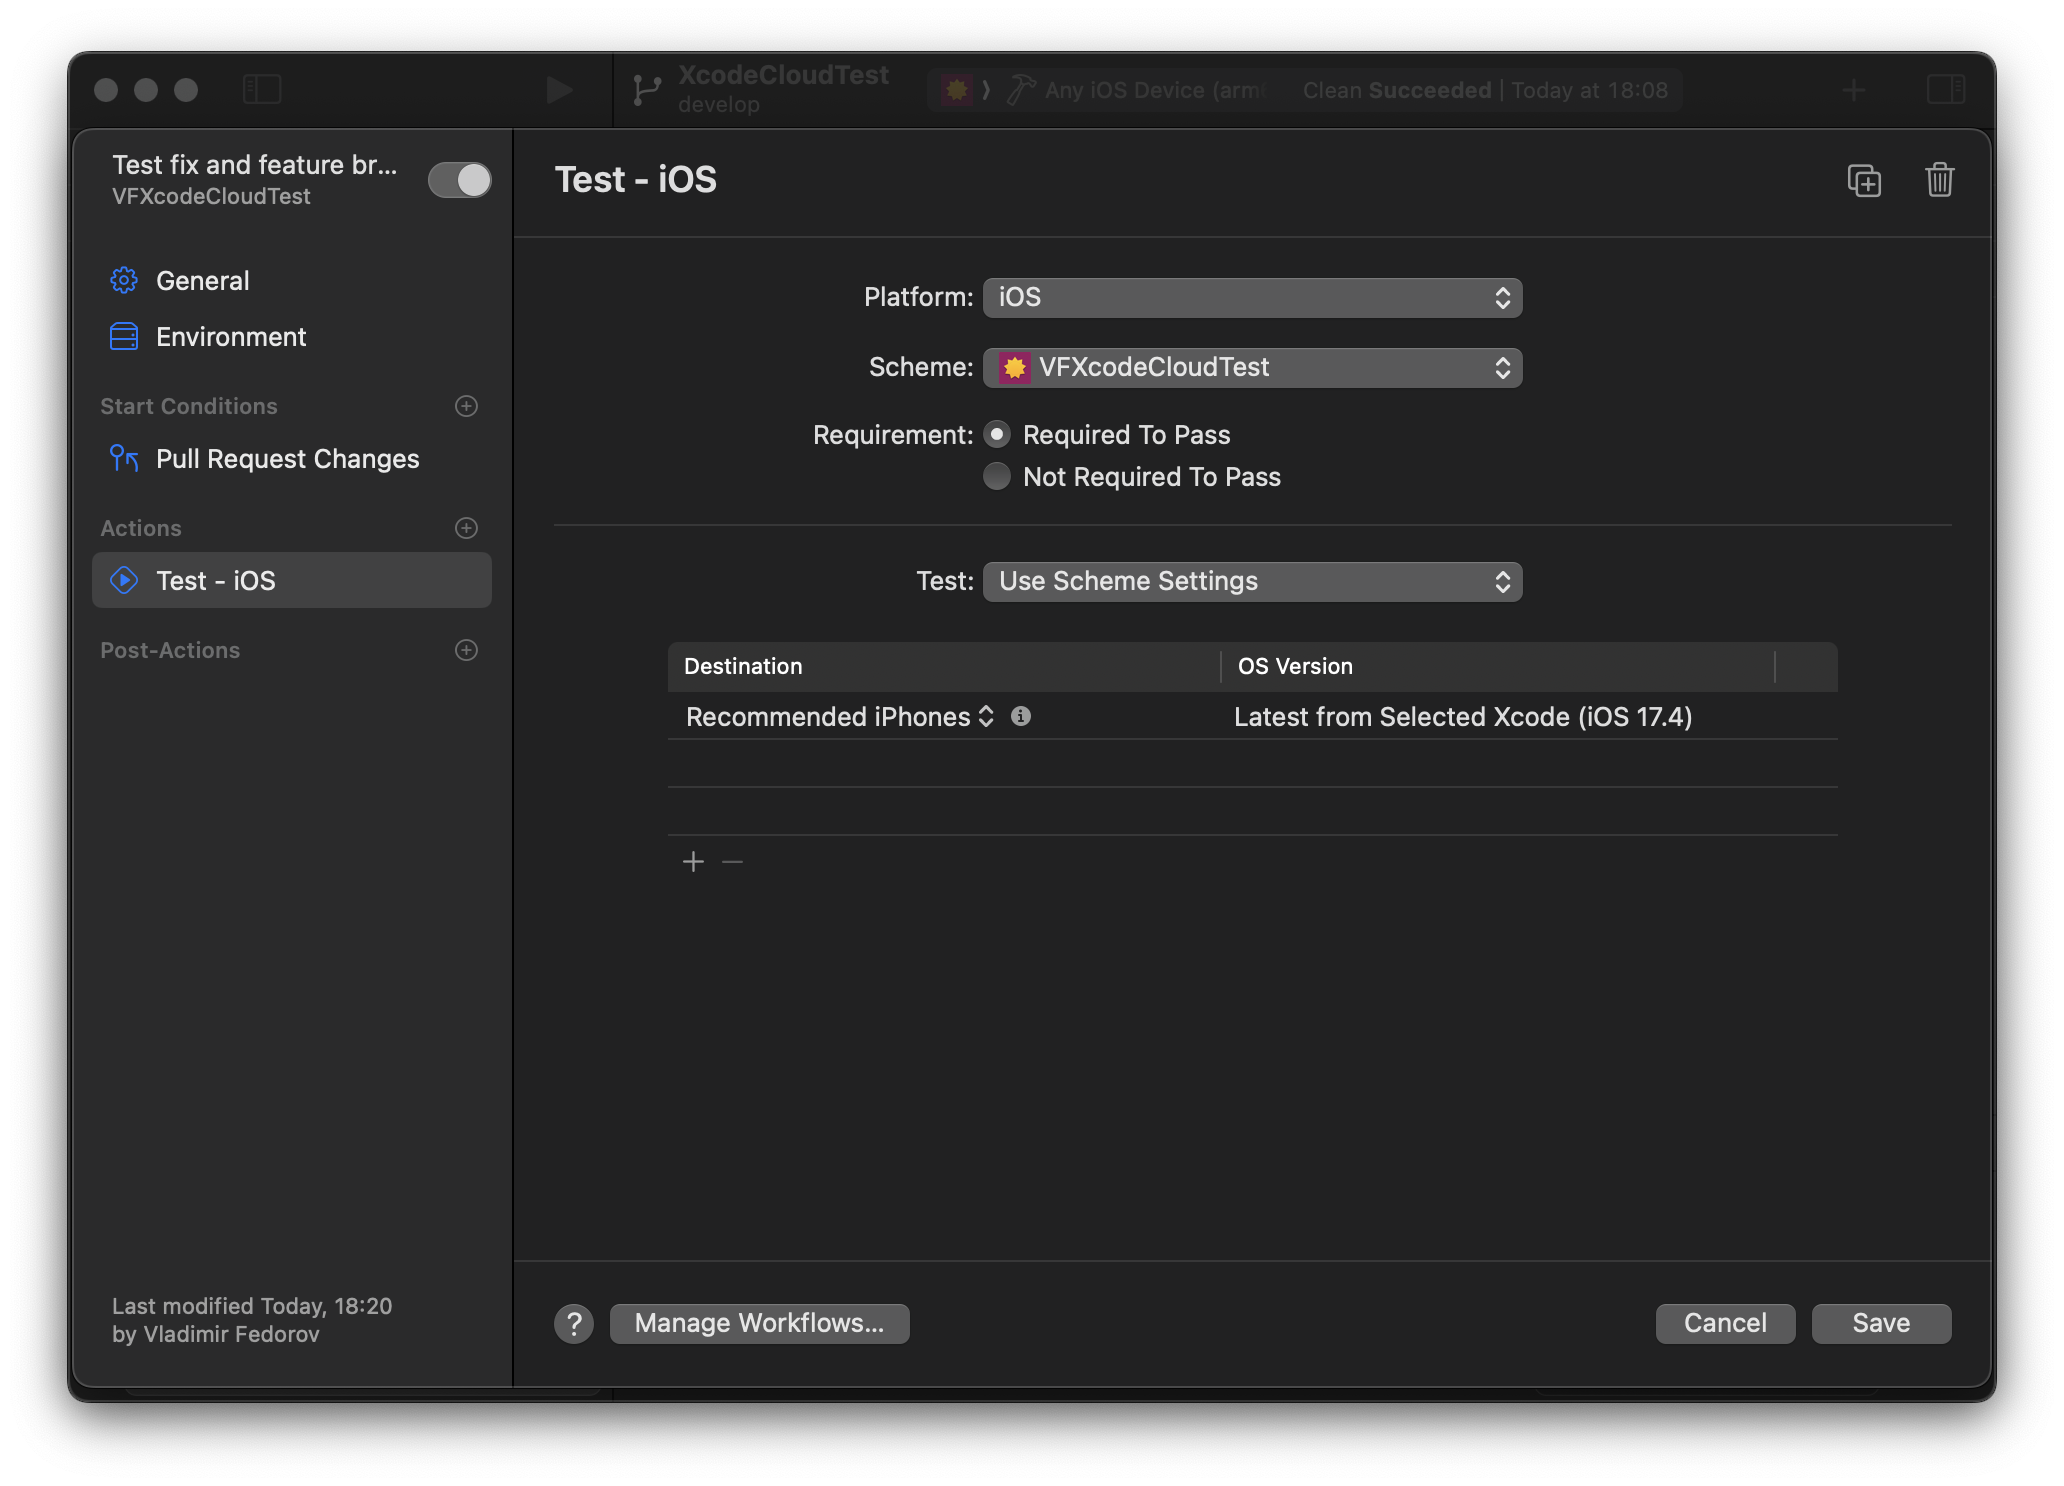
For a multiplatform application, the "Platform:" parameter allows one to choose one of four platforms to test the app against: iOS, macOS, tvOS, and watchOS.
If you want to run unit tests in a macOS environment, make sure the "Disable Library Validation" checkbox is checked in the "Signing & Capabilities" - "Hardened Runtime" section of your Xcode project settings: unit tests fail with the "(target name) not valid for use in process: mapping process and mapped file (non-platform) have different Team IDs" error without that.
Creating TestFlight builds for internal testing
Once the code is merged to develop, it's time to make a new build and upload it to TestFlight for testing.

To do that, we add "Branch Changes" in the "Start Conditions" section of the workflow and select the develop branch.

In the "Actions" section, we add two actions: "Test - iOS" and "Archive - iOS”.
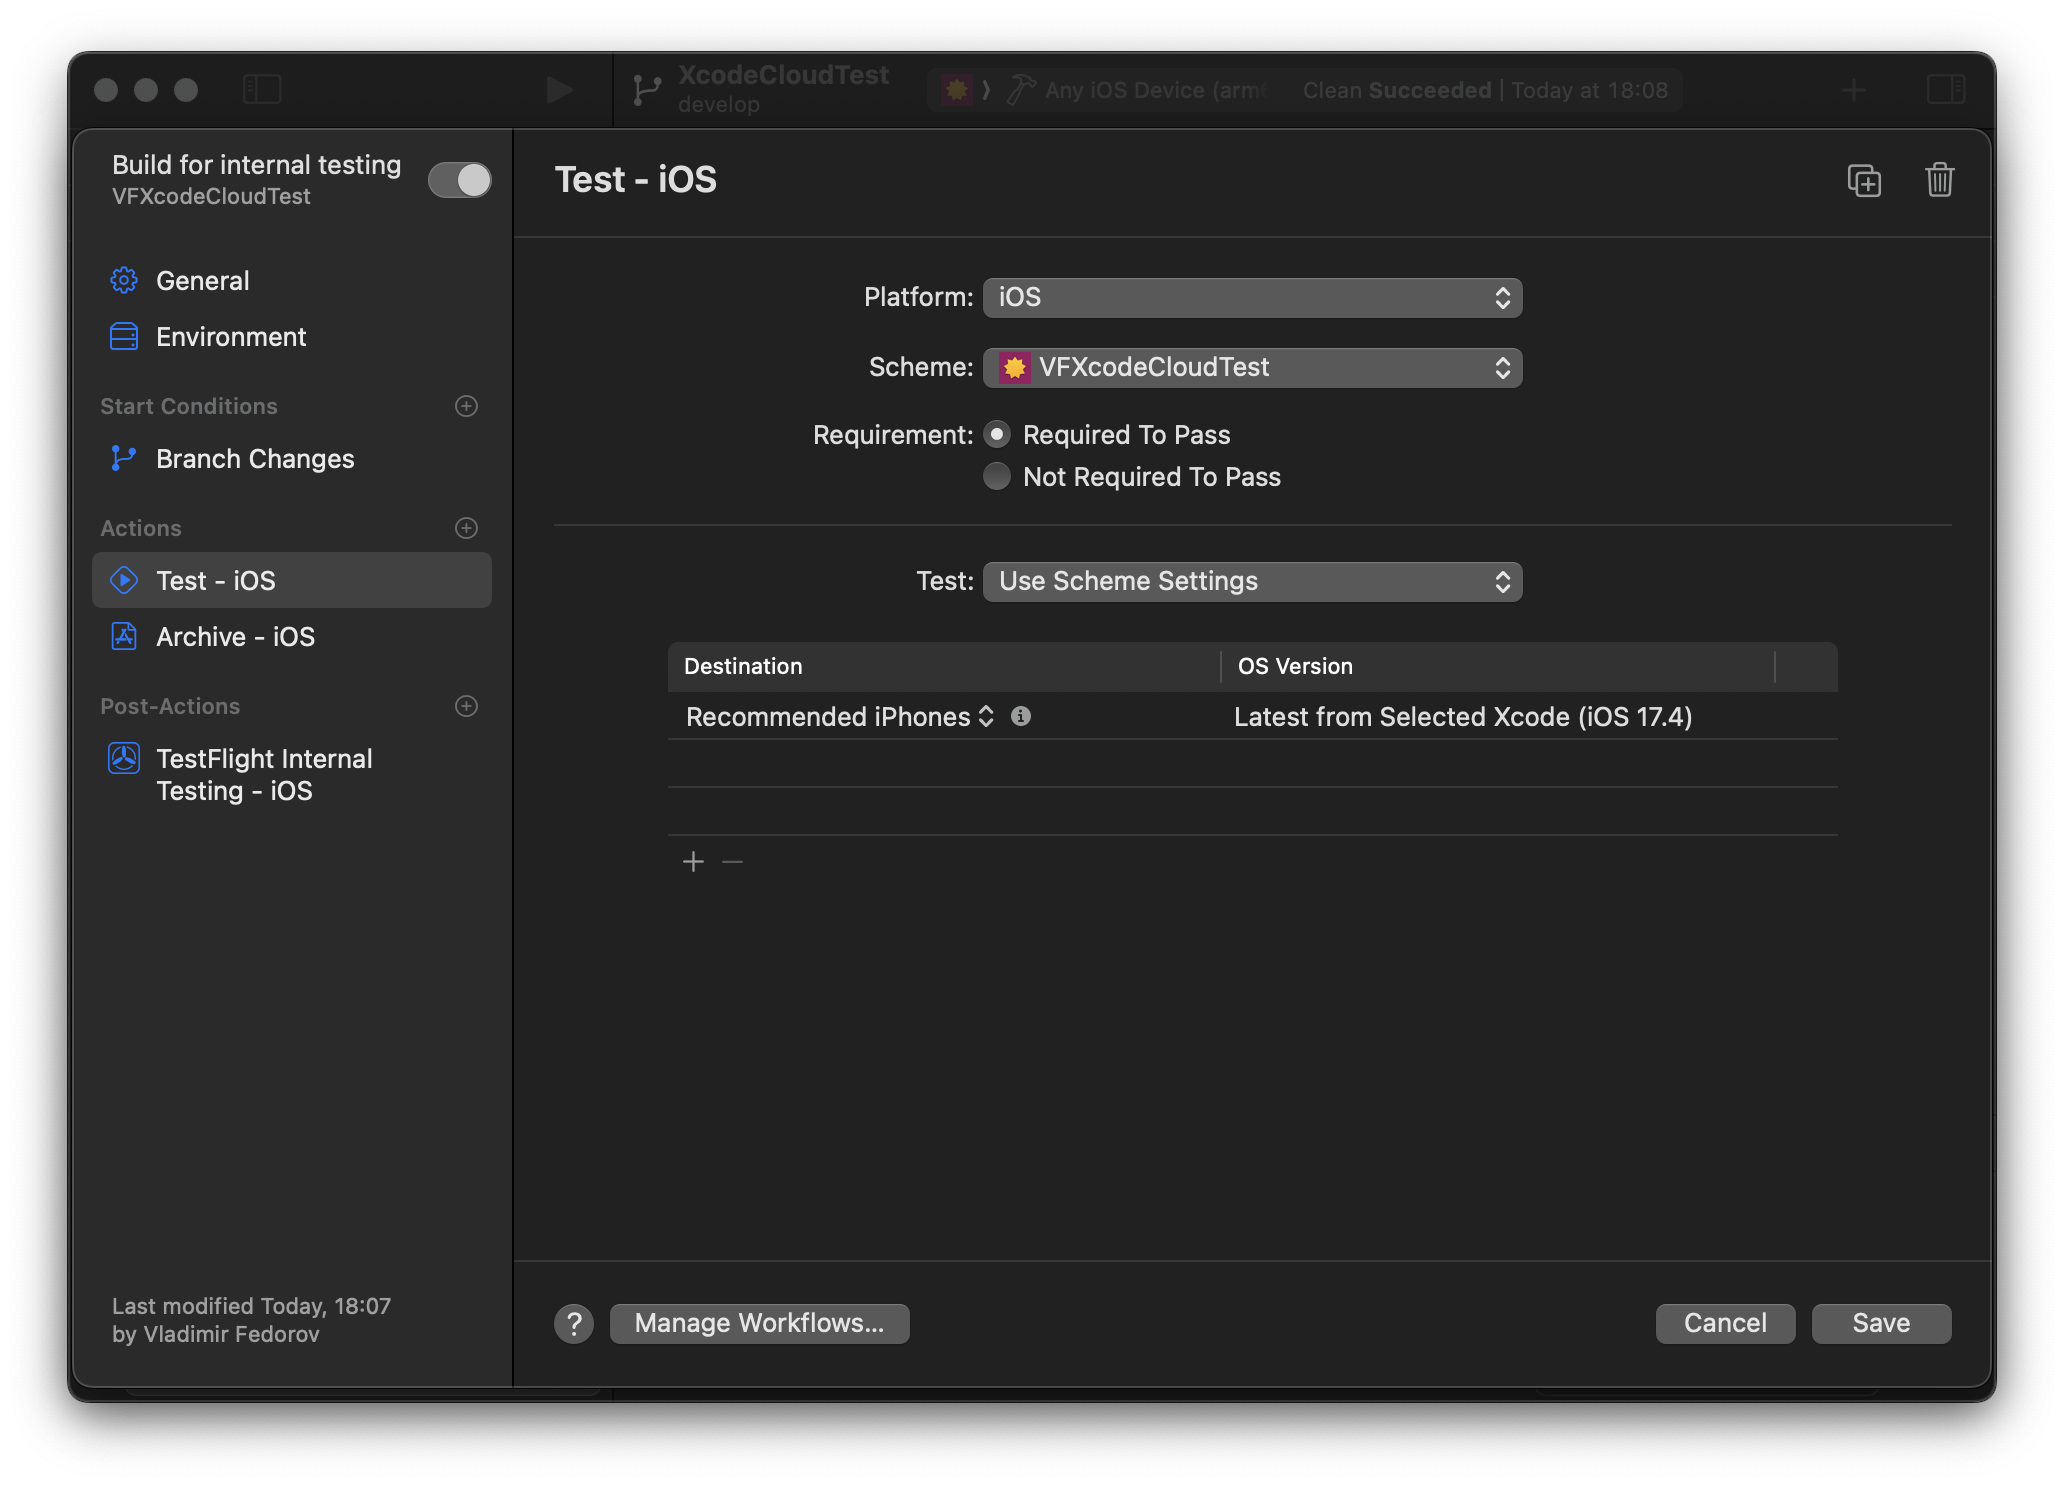
In "Archive - iOS," we need to tick the "TestFlight - Internal Testing Only" option in the "Deployment Preparation:" parameter; this means Xcode Cloud will sign the build with the development certificate.
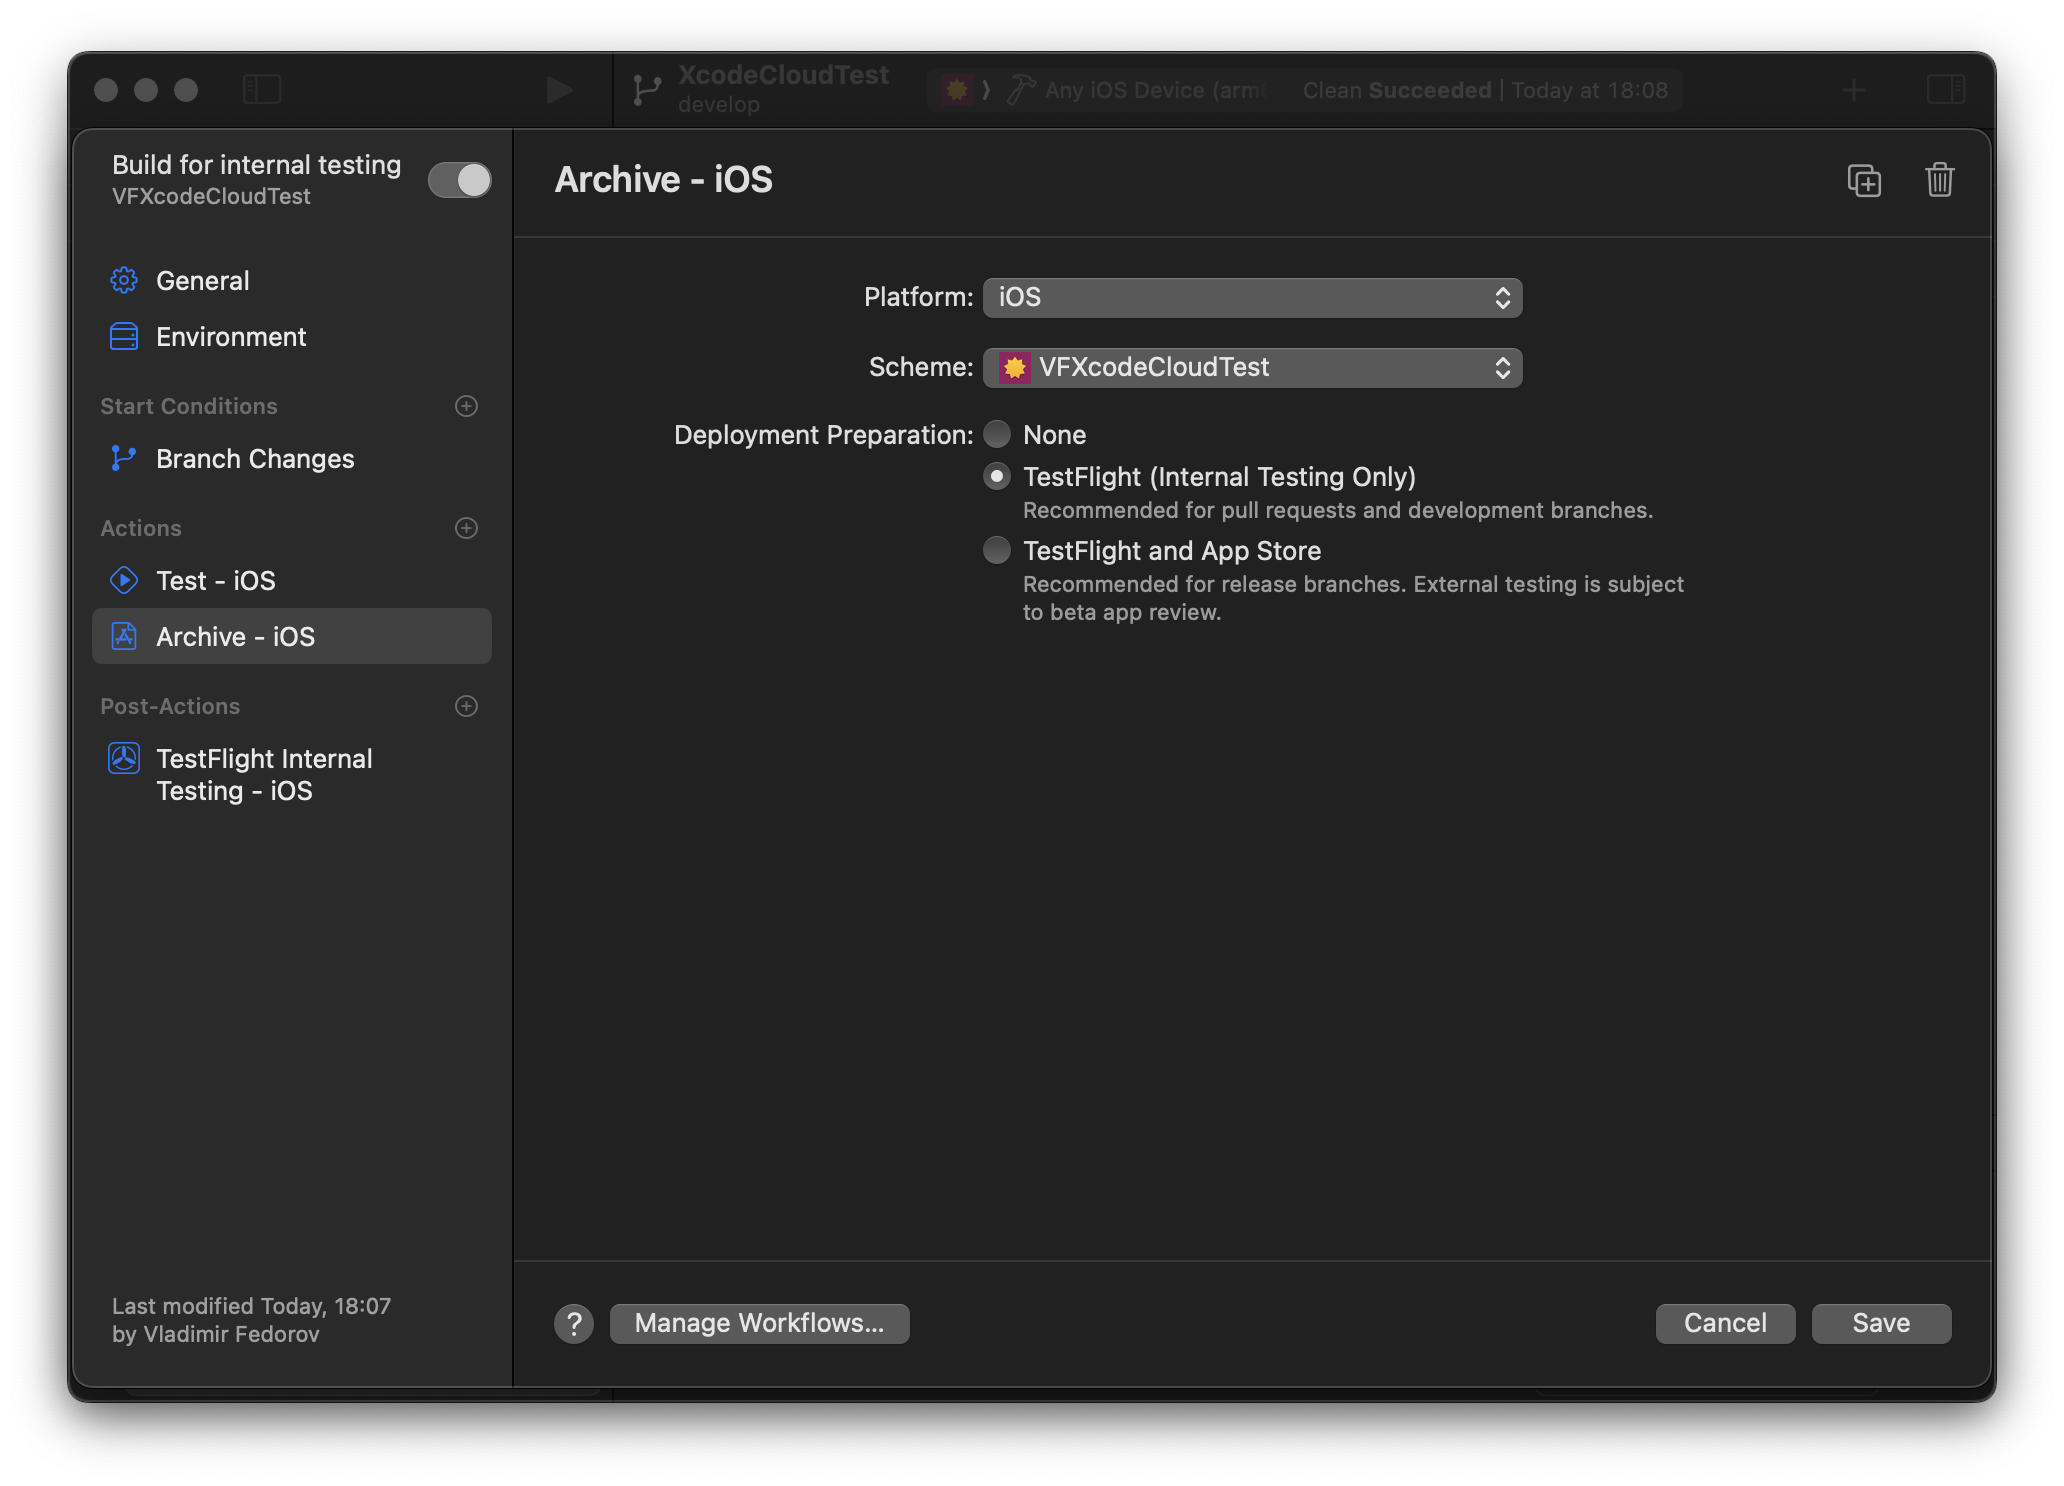
Finally, we add "TestFlight Internal Testing - iOS" under the "Post-Actions" section.

Here, we need to add a group of testers to test the build.
Creating TestFlight builds for external testing and publication
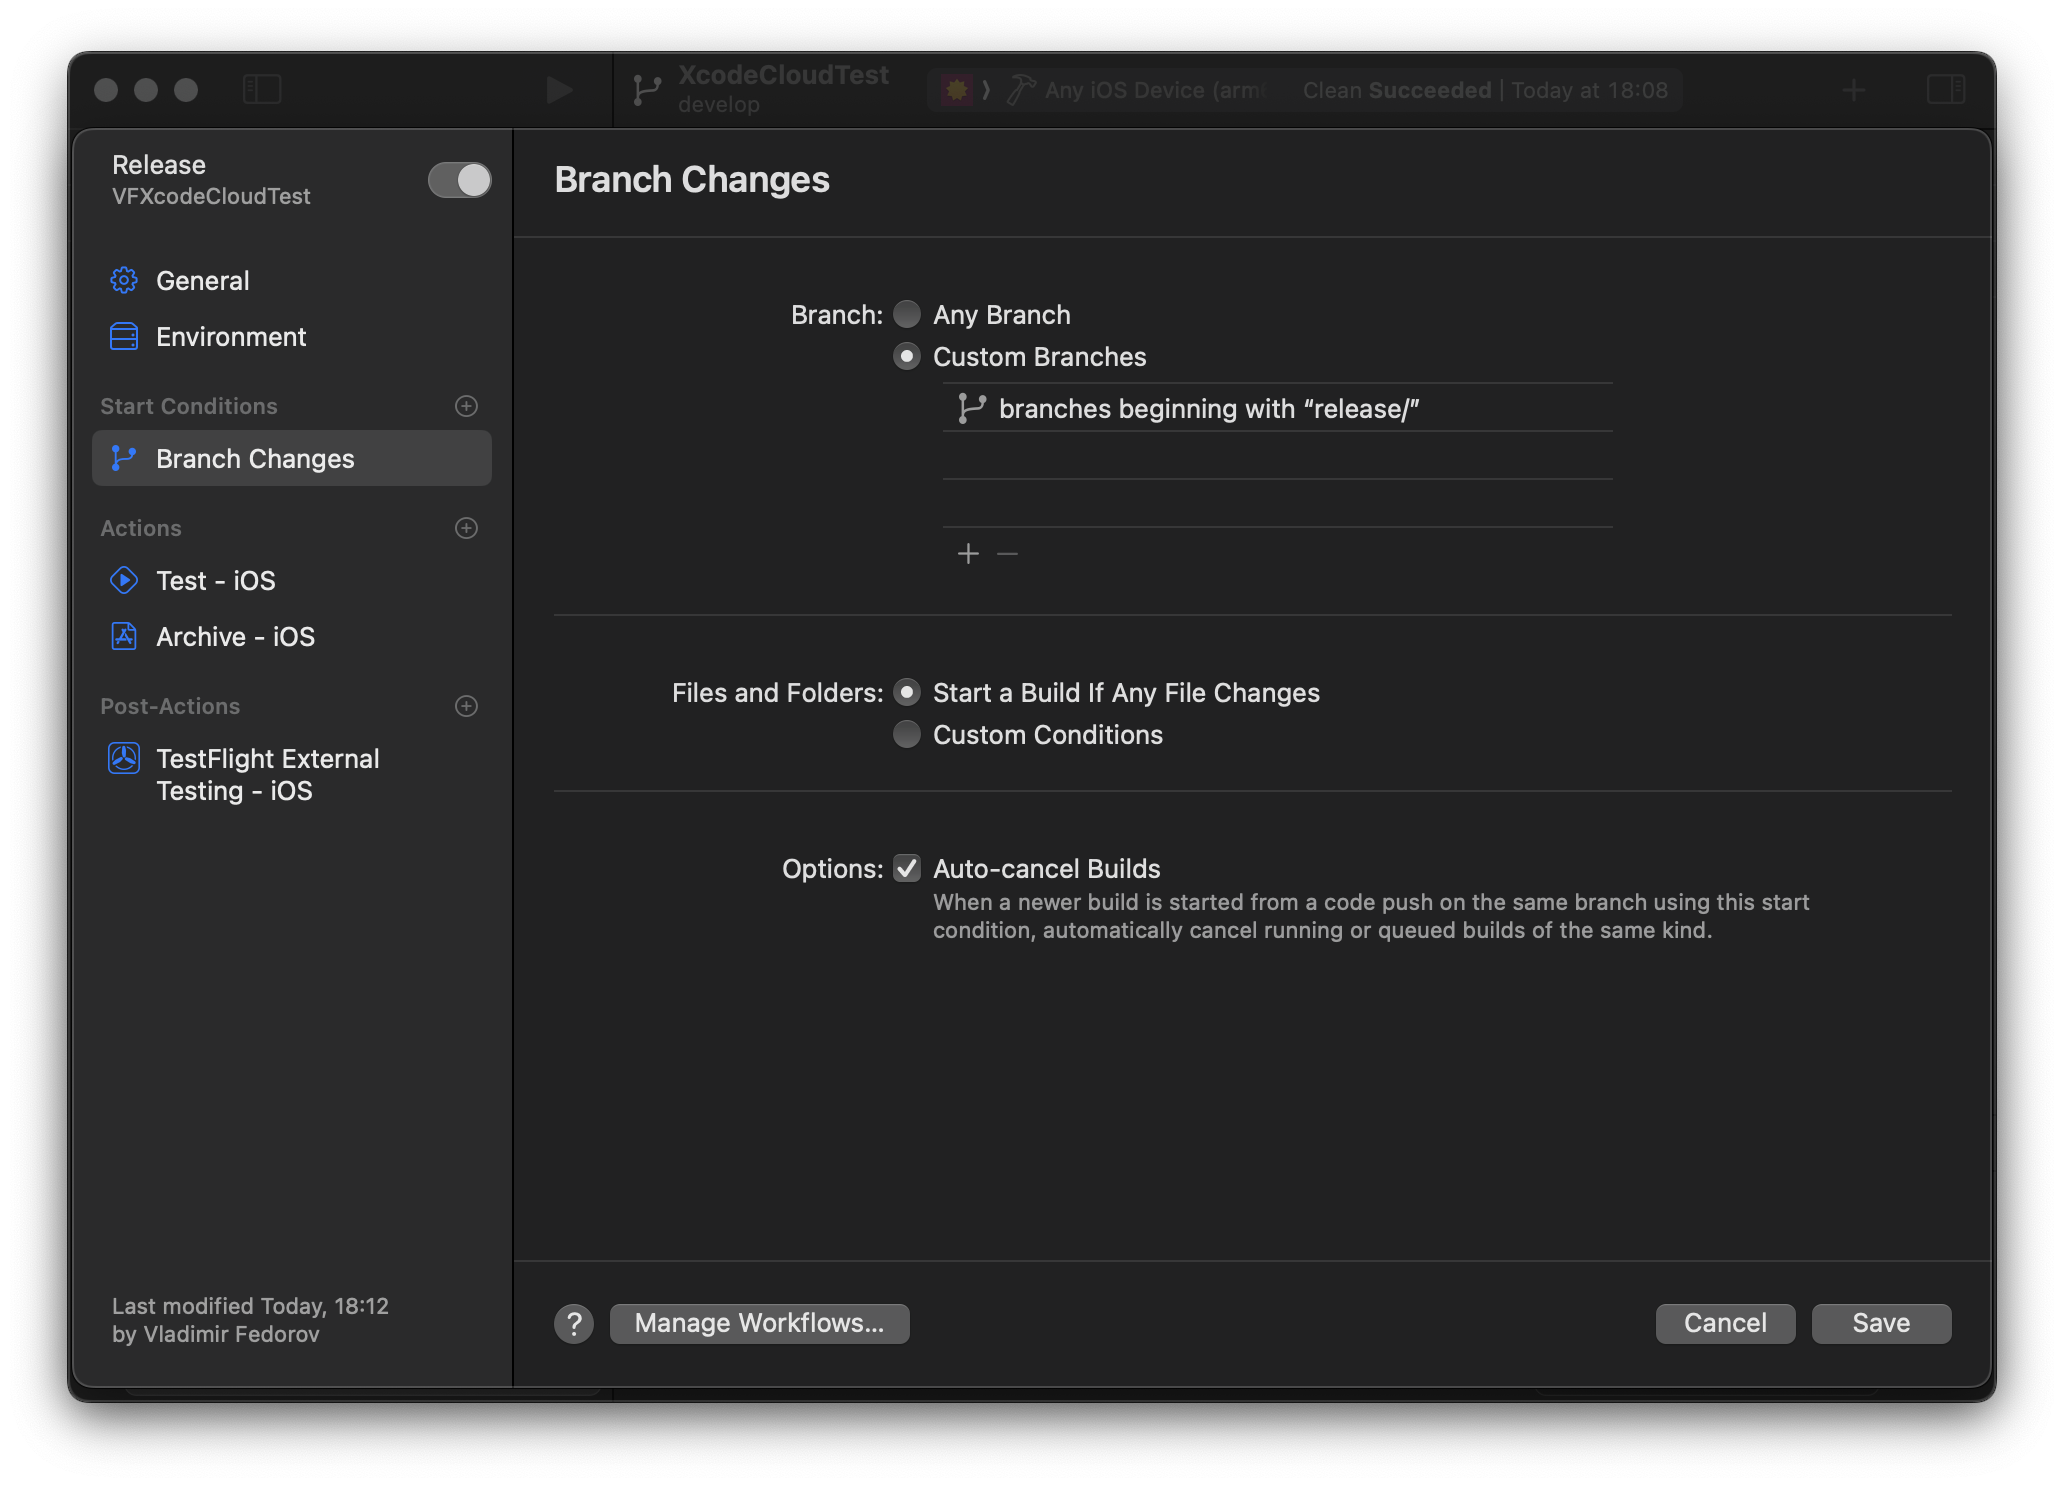
Finally, let's create a workflow that uploads a build signed with a distribution certificate. The workflow will run every time code in a release/ branch changes; a build from this workflow can later be published on the App Store.
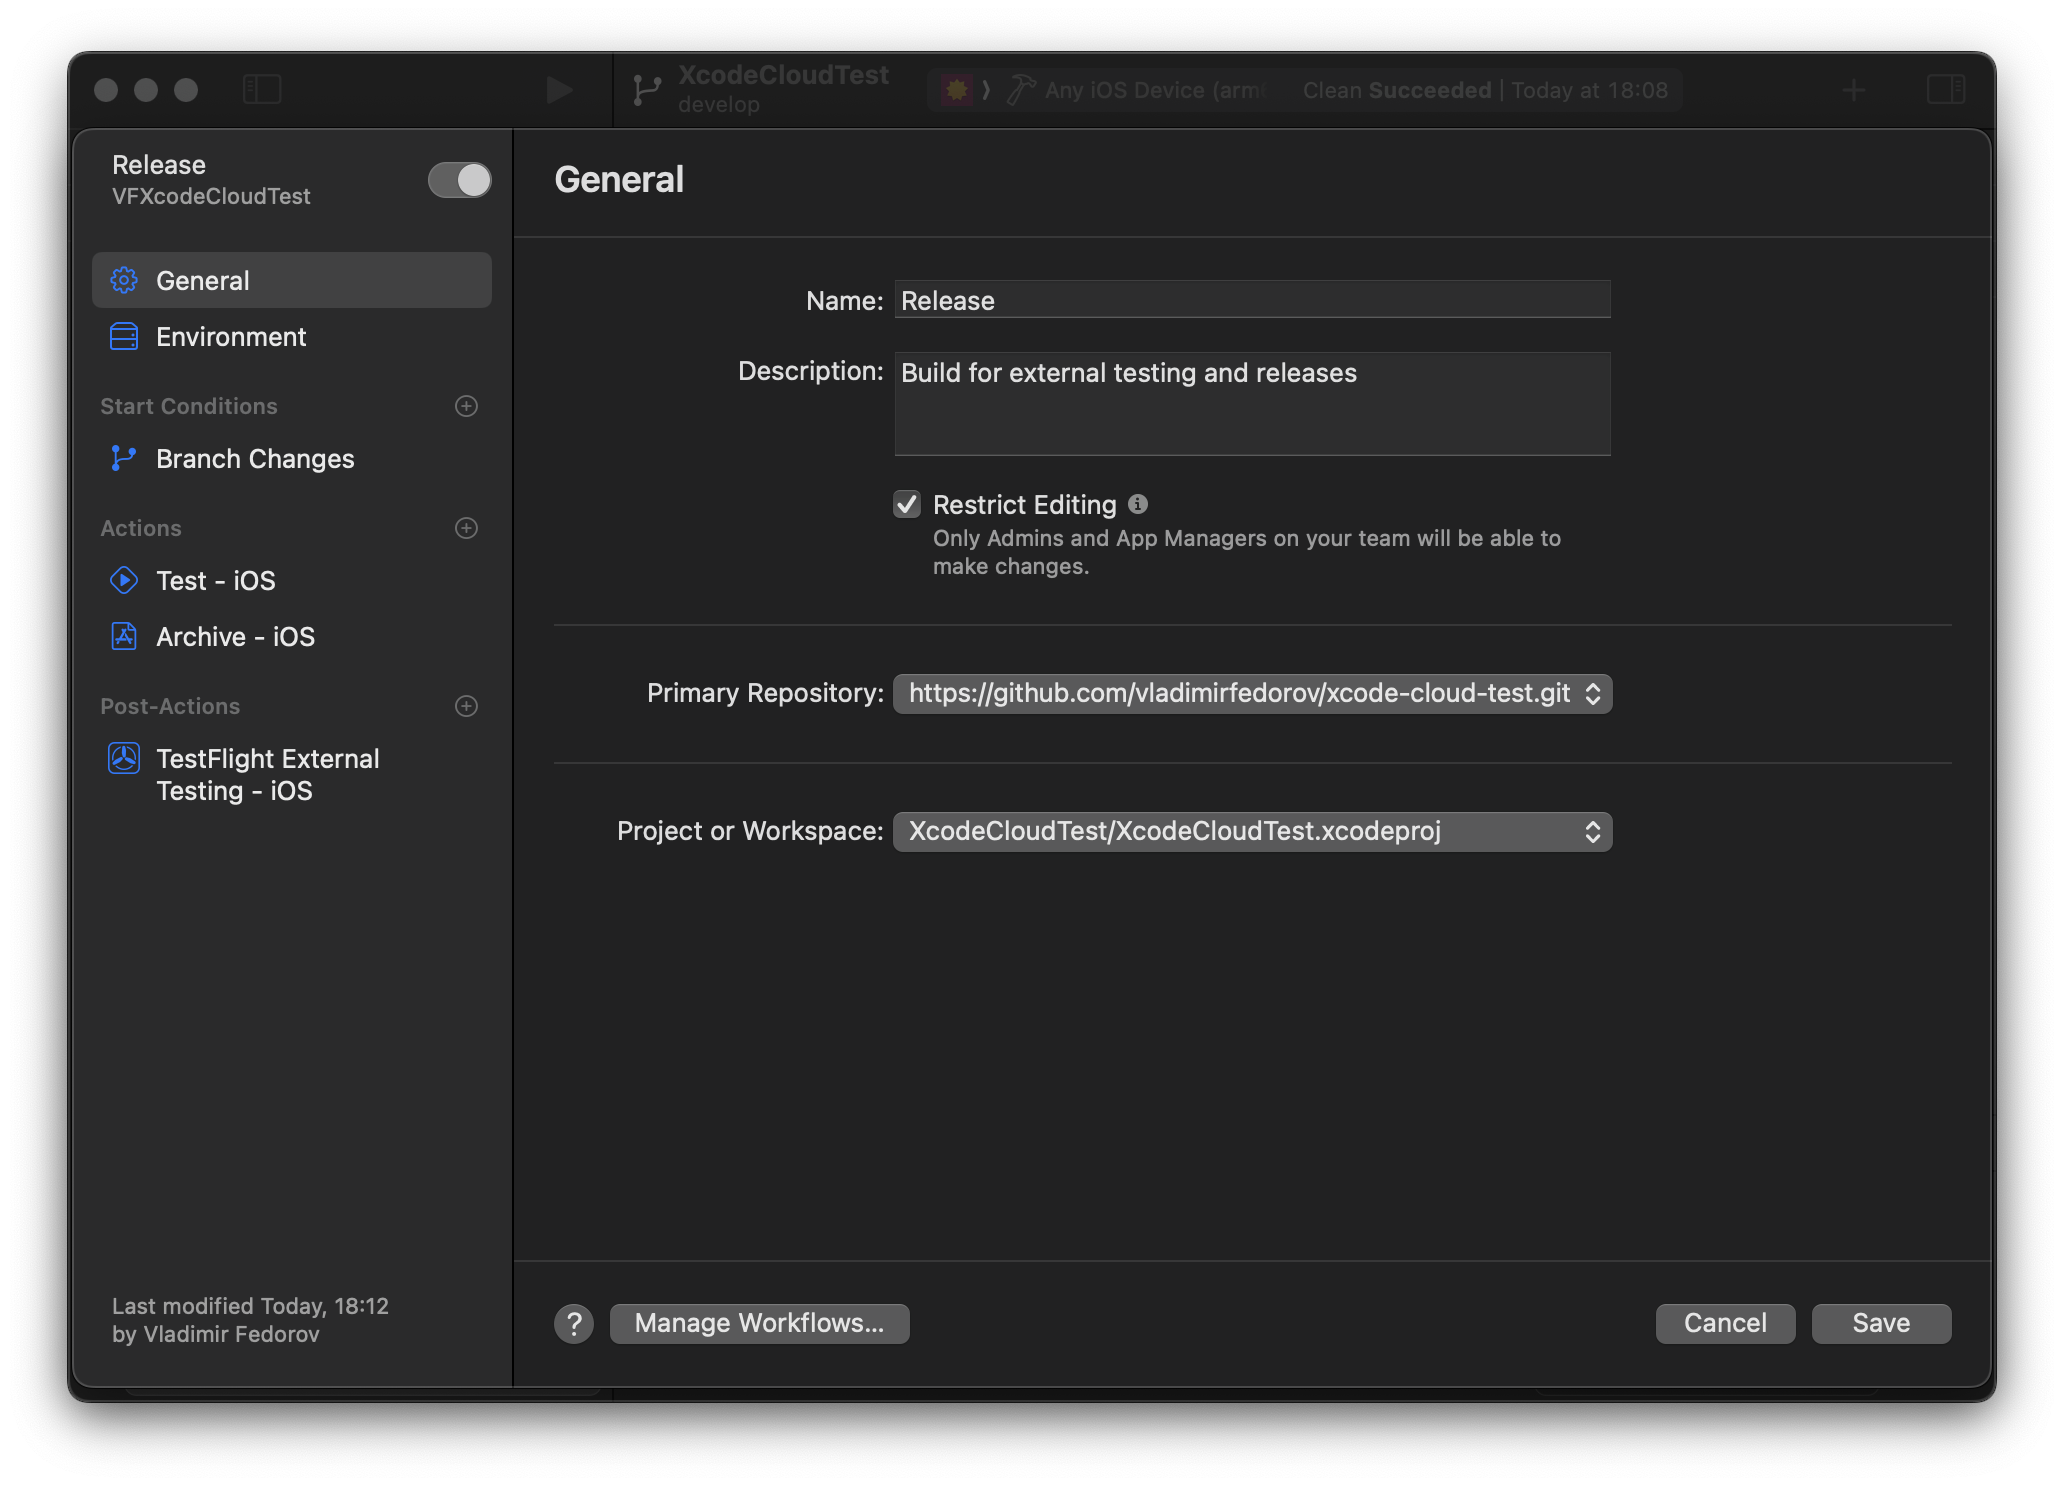
The first difference from the previous workflow is that we need to check the "Clean" option in the environment section - the build time will increase, but Xcode won't use cached data for the build.
Then, add "branches beginning with release/" In "Start Conditions" - "Branch Changes":
Next, add "Test" and "Archive" actions under the "Actions" section.
In "Archive - iOS," we need to check the "TestFlight and App Store" option to sign builds with the distribution certificate.

Finally, add the "TestFlight External Testing" step under the "Post-Actions" section and select an external testers group.
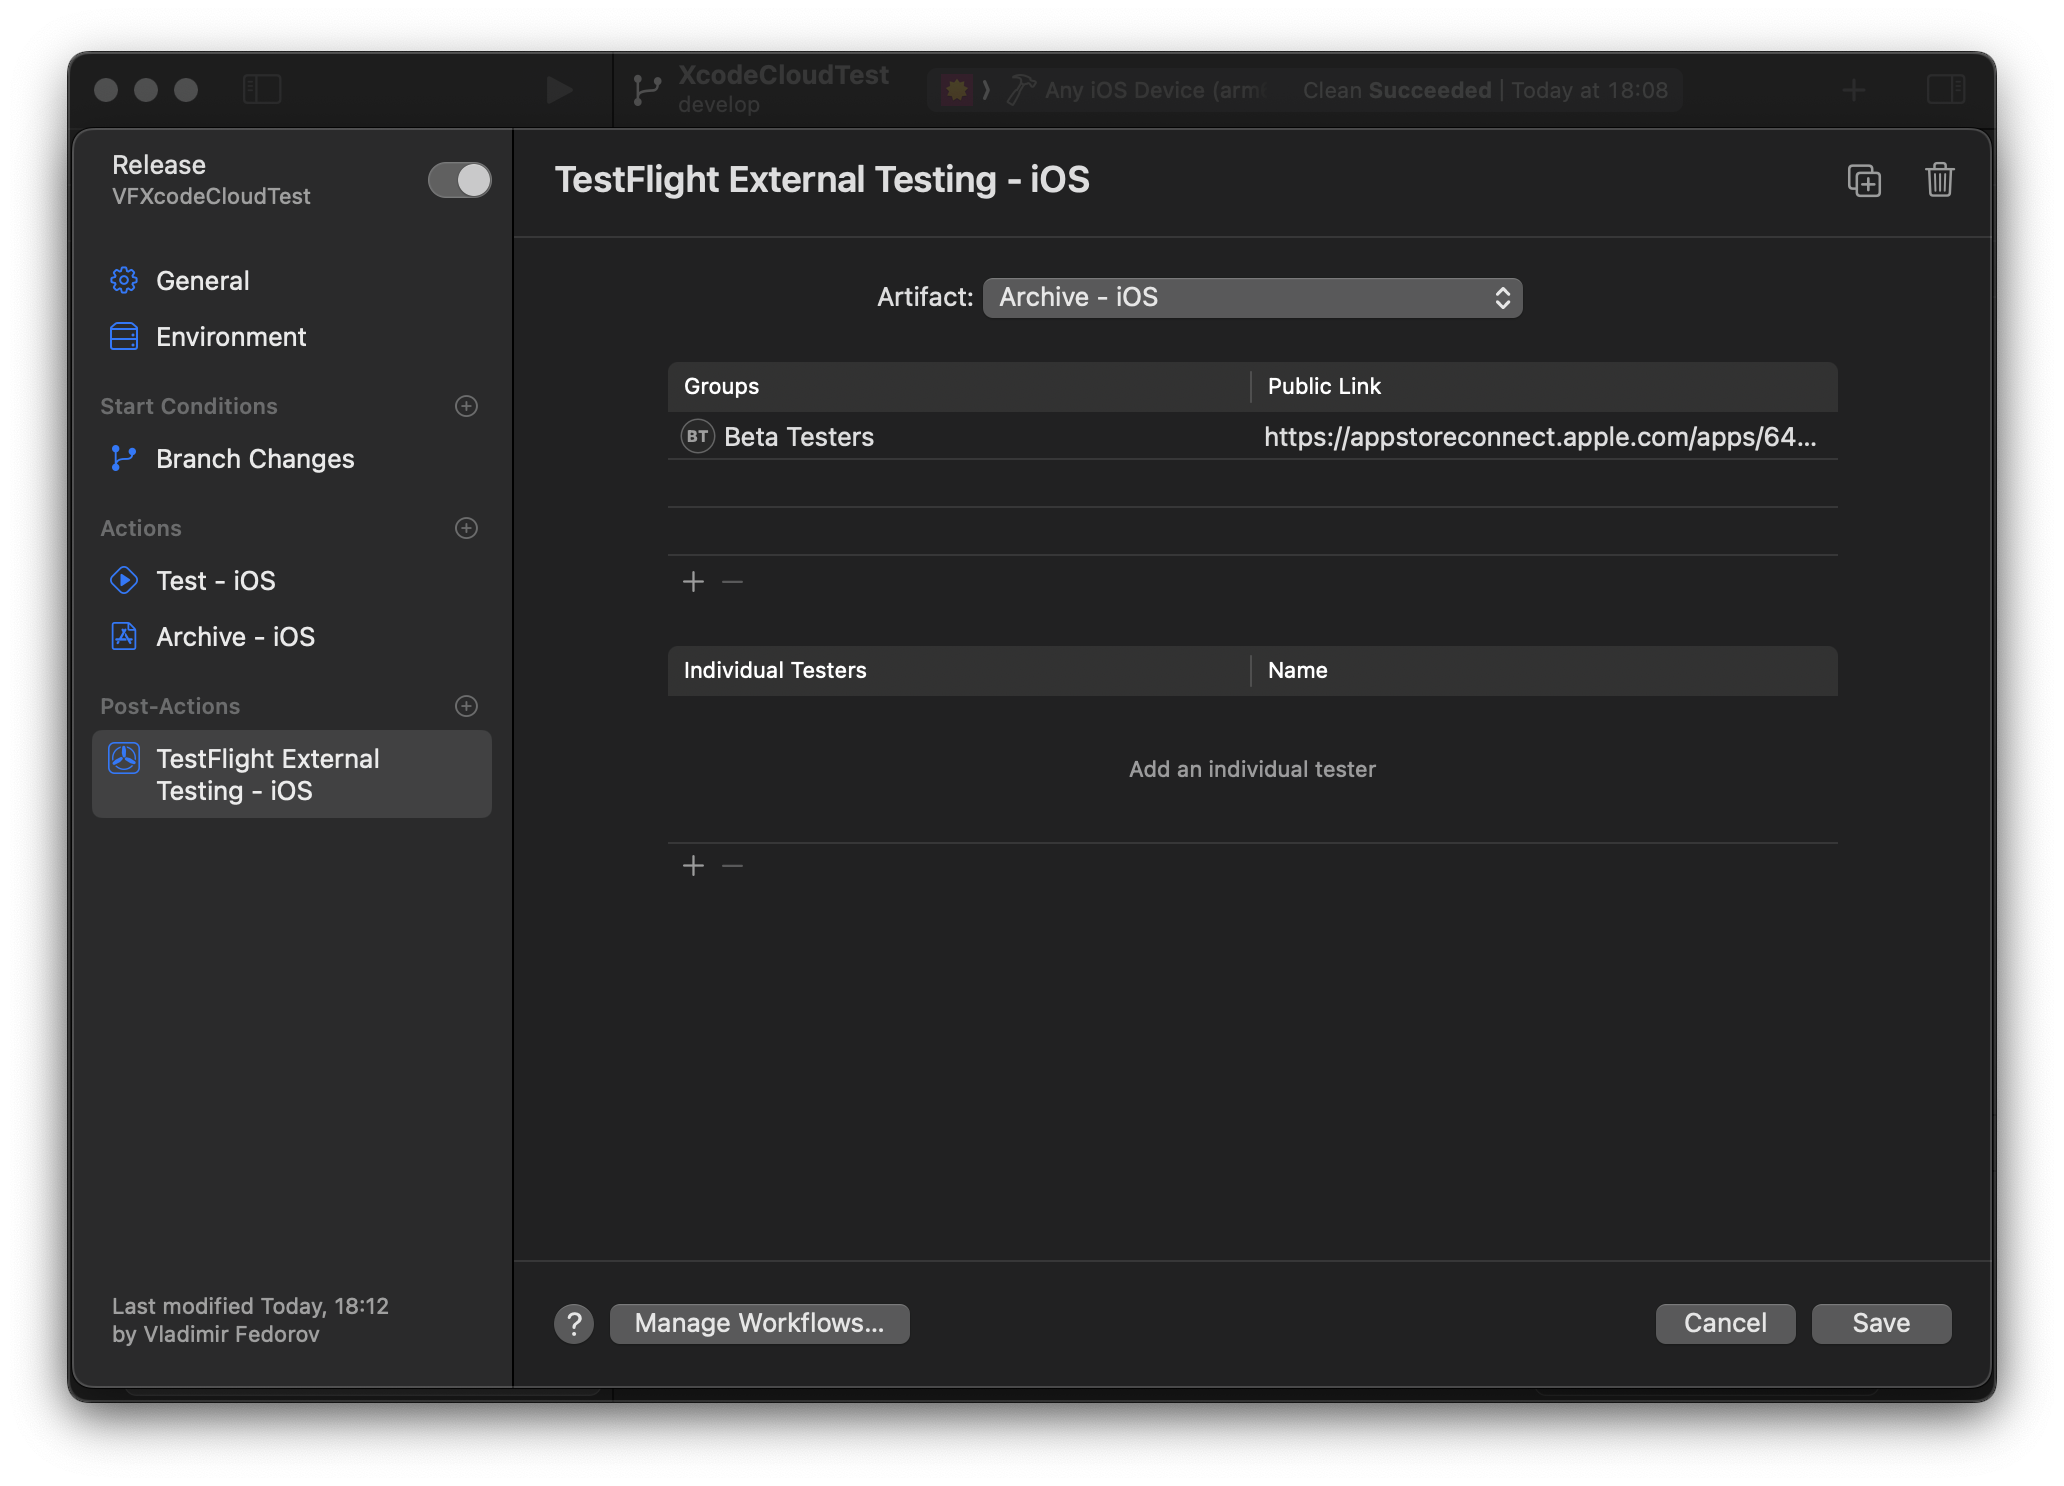
That concludes our minimal setup for Git Flow Workflow. Now, the workflows above will automatically run unit tests for code changes in the selected branches and upload builds to TestFlight.
You can extend these workflows by adding UI tests (as they tend to take more time than unit tests, the use of "On a Schedule for a Branch" under "Start Conditions" can run them nightly, for example) and adding "Analyze" step for static code analysis for all the commits to a selection of branches. The main benefit of Xcode Cloud is that all these workflows — as well as source control operations — are easily accessible within Xcode and help contain important information like secret variables and optional build variables within the same project, rather than storing them on a source control platform.
Workflow Status
You can check workflow status in Xcode by clicking on a workflow on the TestFlight page in the App Store, and you can see the progress on the related pages of source control platforms. Here's an example of Xcode Cloud workflows running on Github's pull request page:
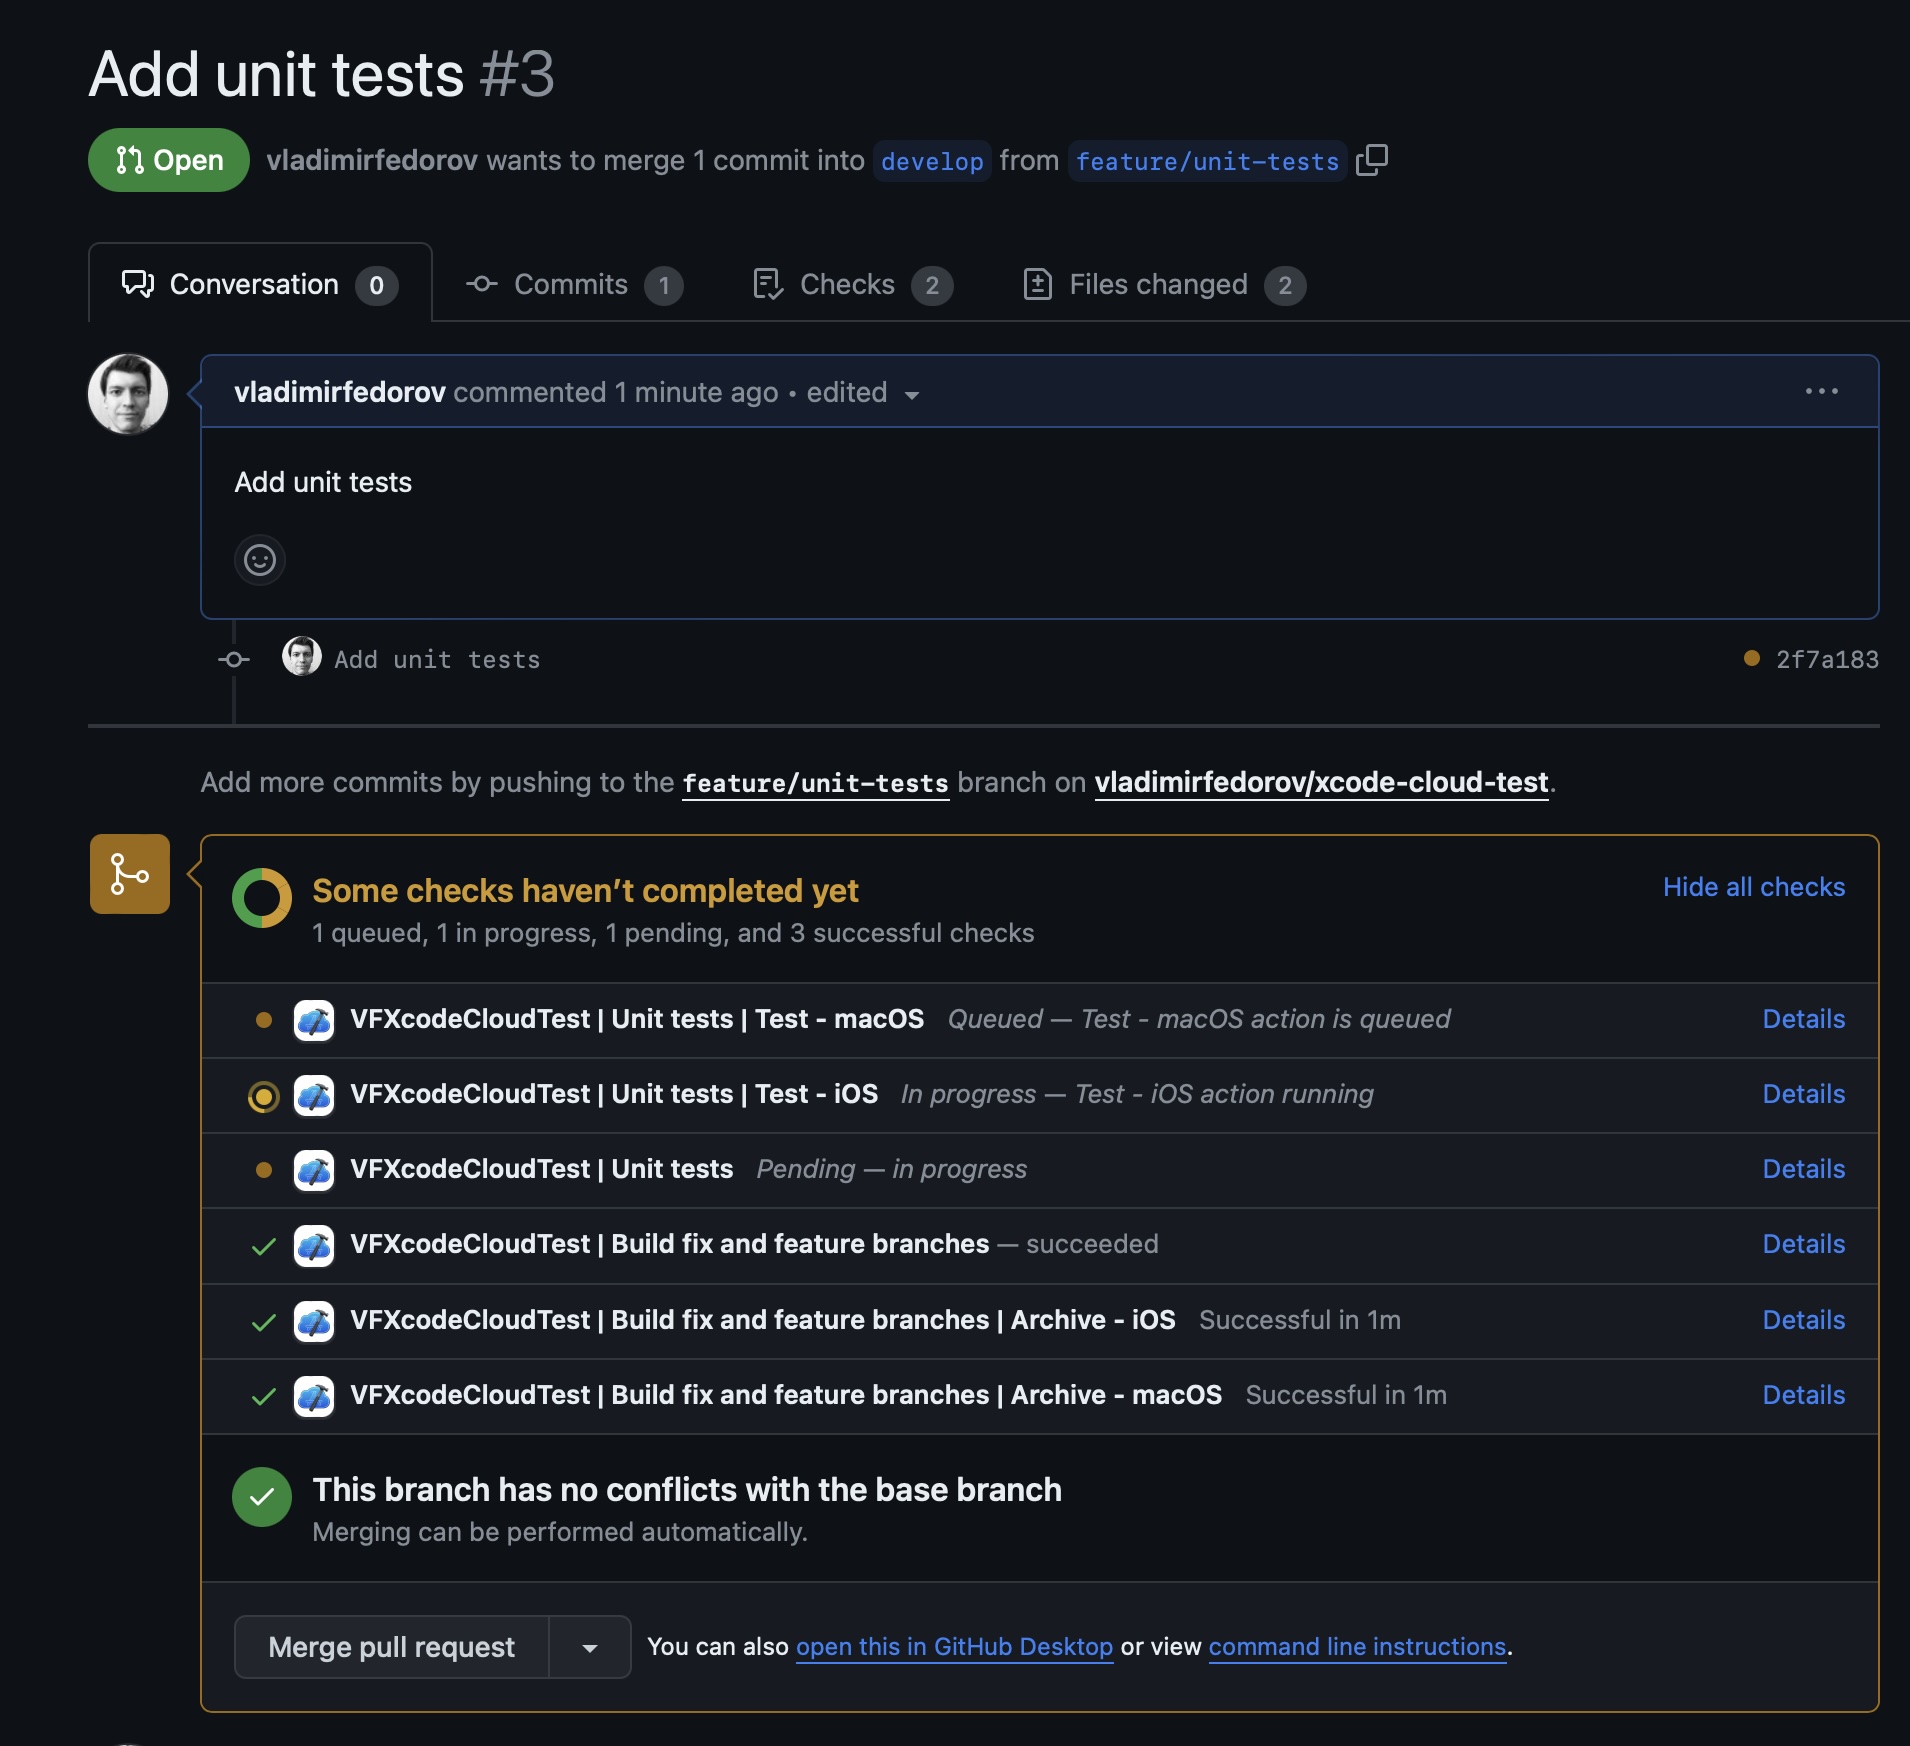
It's worth mentioning that Xcode provides access to these workflow logs and artifacts on Xcode Cloud page as well.
Conclusion
If you haven't tried Xcode Cloud yet, I recommend giving it a shot. It has significantly improved my workflow efficiency, and I think it could do the same for you.